
What is Arduino IoT Cloud?
Arduino IoT Cloud is an IoT dashboard platform that allows us to connect Arduino-compatible development boards to the Internet and access/control them remotely. It is designed to make it easy for developers to build Internet of Things (IoT) applications using Arduino-compatible boards.

Let’s build a simple project to turn ON/OFF an LED and read temperature and humidity reading from a DHT11 sensor and display the result in the cloud dashboard so that we can learn more about the Arduino IoT Cloud platform.
Hardware Needed
| Components | |||
|---|---|---|---|
| ESP32 NodeMCU | |||
| ESP8266 NodeMCU | |||
| DHT11 Module |
Software Needed
| Application | Pay Store | App Store | Mac/Win/Linux |
|---|---|---|---|
| Arduino IoT Cloud | |||
| Arduino Create Agent |
Follow the below steps to create our first IoT project!
1. Sign up to Create
Initially create an account in arduino.cc to access the IoT Cloud platform and other Arduino services like web editor. Now sign in using your new account and move to the Arduino IoT Cloud.
2. Creating a thing
Click on the “Things” tab in the top navigation bar. Then click on the “Create a new thing” button to start the process of creating a new IoT device.
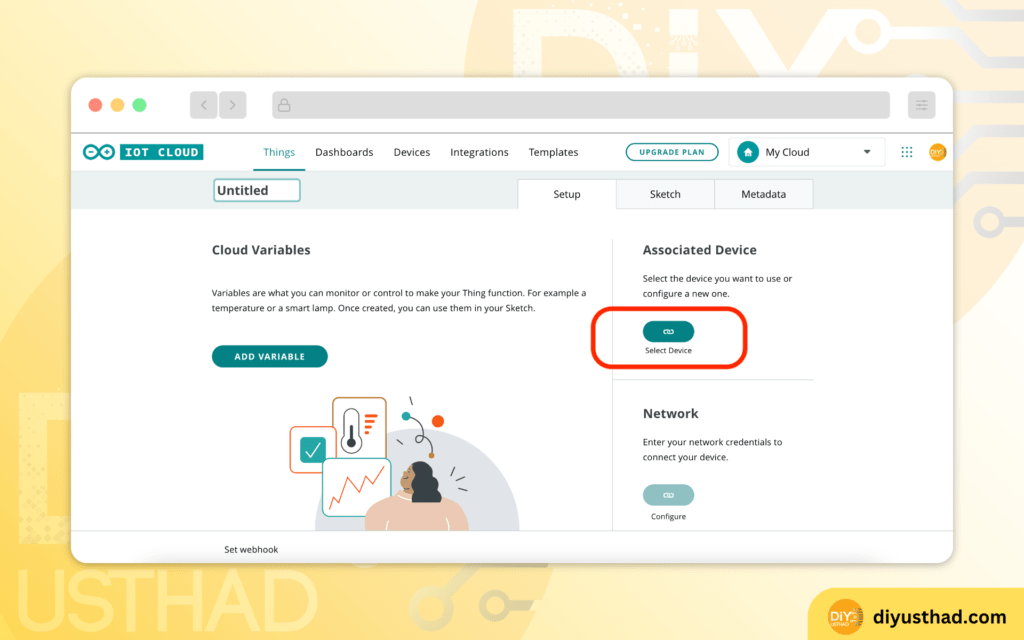
1. Configuring a device
When you reach the below screen, you can provide a name for your thing and then click on the Select Device button under the Associated Device section.
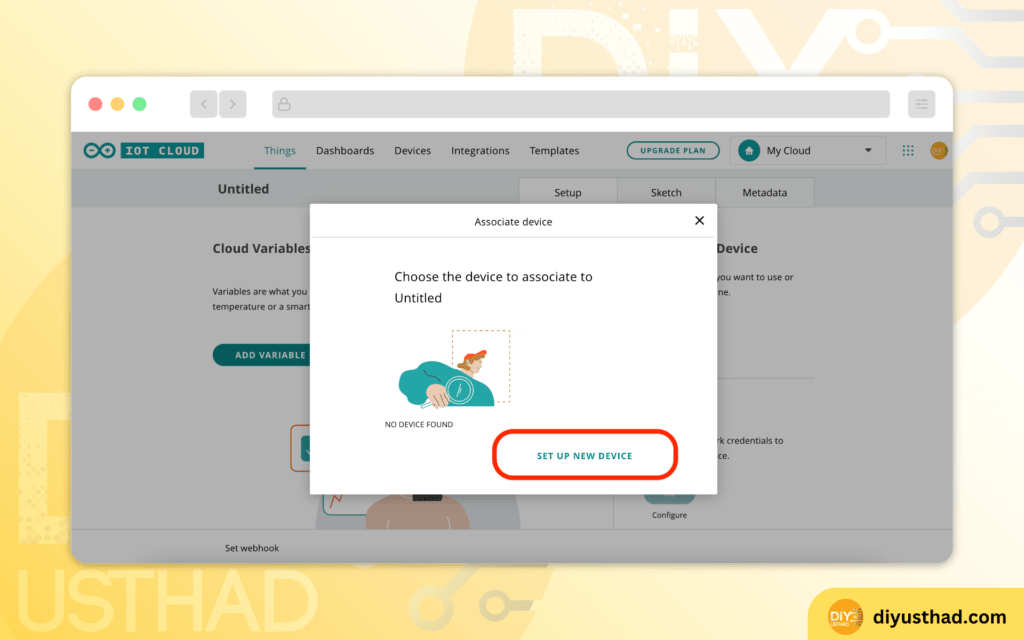
Now a popup window will appear which will list your previously created devices and a button for creating new devices. As in the below screenshot, you can see that we don’t have any previous devices so we are going to create a new device by clicking on the SET UP NEW DEVICE link.
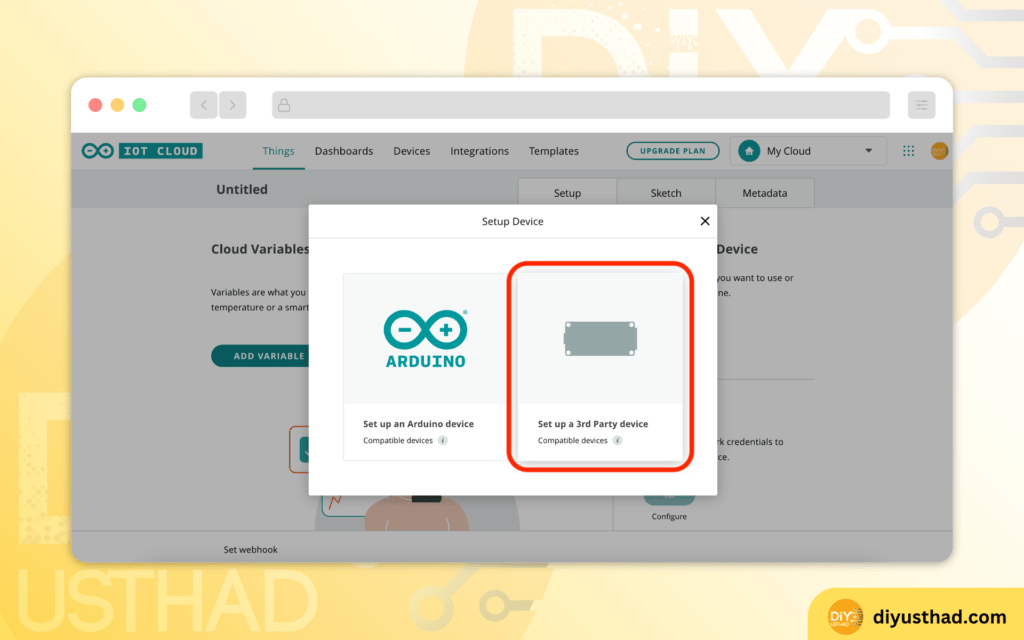
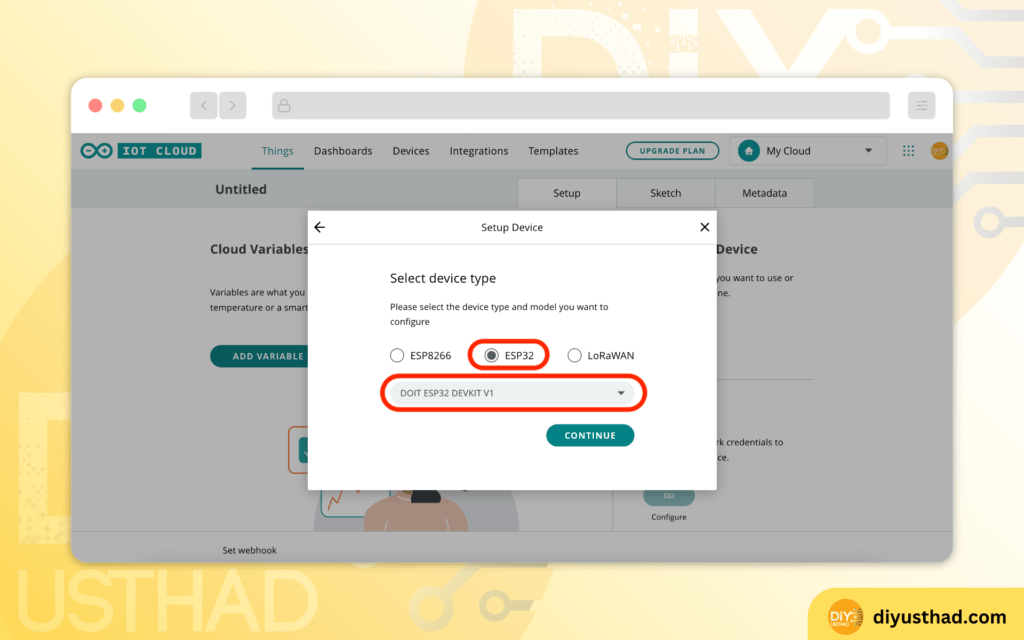
Now we need to choose the device which we are using, as in our case because we are using ESP32/ESP8266 which is not a device from Arduino so choose Set up 3rd Party device.
Now select the device type and device model from the dropdown menu. I’m choosing ESP32 and model DOIT ESP32 DEVKIT V1. If you are using ESP8266 then choose accordingly.
Now give a name for your device, note that no special characters or space is allowed.

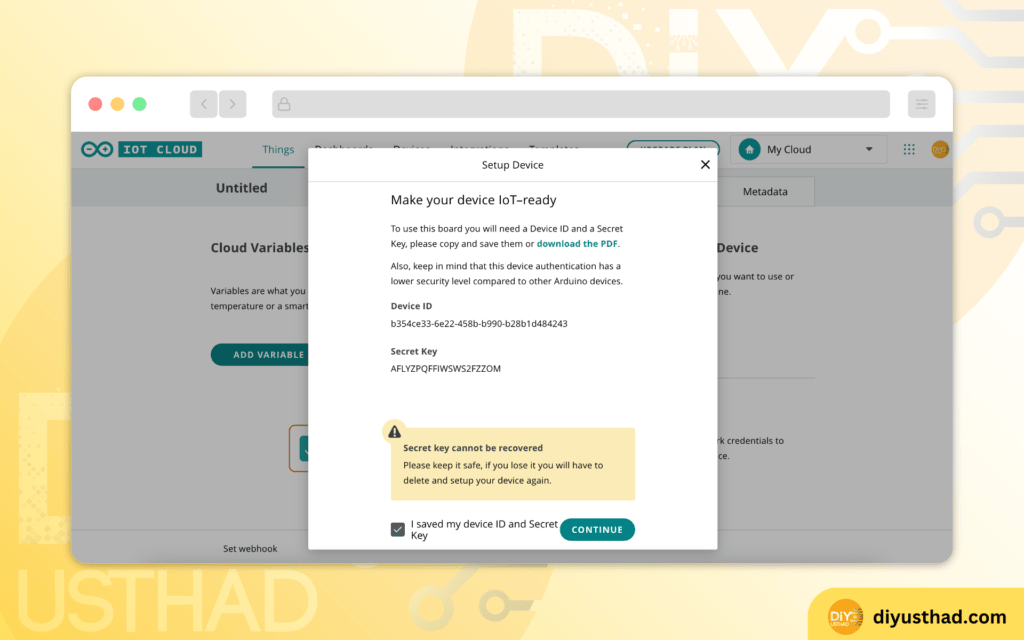
Now a Device ID and Secret Key will get generated which we need to save by clicking on the download the PDF link. We will need these details in the future. After downloading click on the checkbox and click Continue.
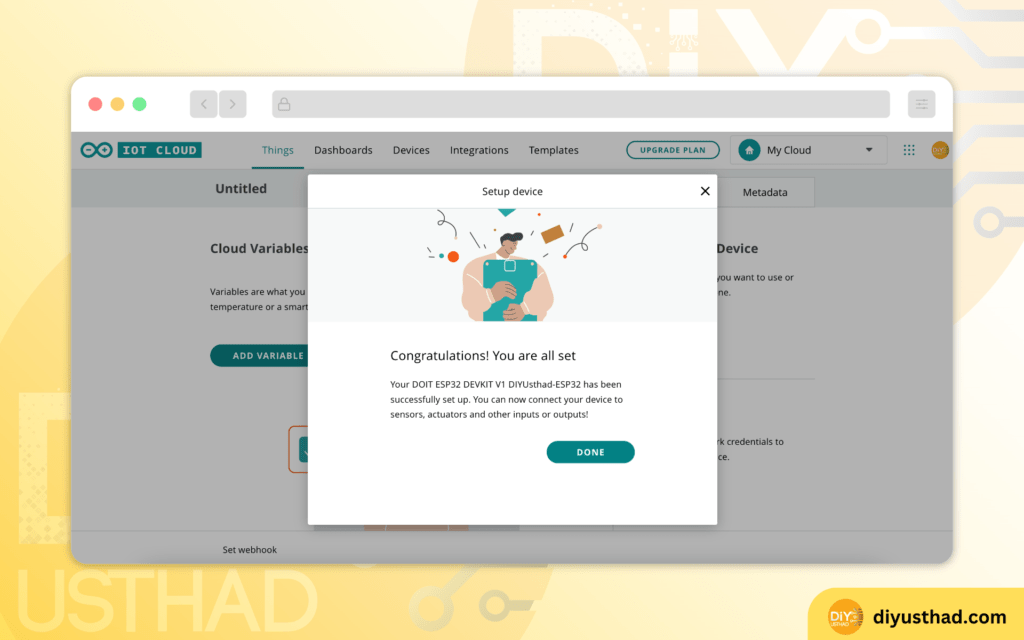
If everything went well we will get the below message of Congratulations! Click Done and let us move to the next step.
2. Creating variables
Now we need to create some variables for the built-in LED on the NodeMCU and 2 other variables called Temperature and Humidity for monitoring the data from the DHT11 sensor.
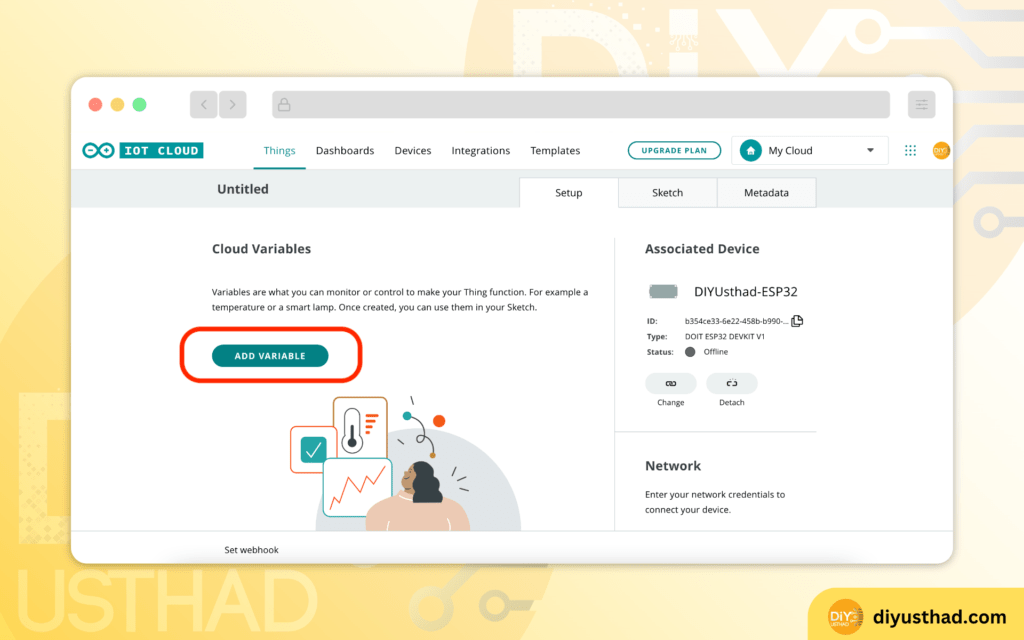
To create a variable go to the Setup tab under the Things page and click on the ADD VARIABLE button.
Once we click the Add Variable button, a popup window will appear where we need to fill in the Name, Variable Type, Variable Permission, and Variable Update Policy.
Let us first create a variable for the built-in LED, give the variable name as “LED” and from the dropdown list of variable types search for light or simply choose bool from the basic types both will work the same.
Now choose Read & Write for the Variable Permission because we need to read and write the status of the LED pin and choose On Change for Variable Update Policy so whenever we change the Variable value it will update the state of our LED.

Now click on the Add Variable button again for creating a variable for Temperature, for variable type just search for temperature or choose the float data type. Choose Read Only for Variable Permission because we don’t need to write any data to the DHT11 sensor and choose On Change or Periodically for Variable Update Policy. If you choose on change the the data will be only fetched when the temperature changes, If you choose periodically then the data will be fetched from the ESP32 at a particular interval which we can set even if there is no change in the temperature value. Click the Add Variable button to save the variable.

Like same as the above add a variable for humidity also, for the data type choose float or search for Relative humidity.

Now we can see all the 3 variables which we added under the heading Cloud Variables.

3. Connecting to a network
Now under the Set Up tab finally we need to configure the Network. For that click on the Configure button under Network, which will take us to the configure network window.

Here fill out your WiFI SSID name, WiFi password which is required for your ESP to connect to the network also paste the Secret Key from the PDF which we downloaded in the previous step, and click the Save Button to save the configuration.

3. Editing the sketch
Now go to the Sketch tab and you can see that code is automatically generated but we need to make a few changes like,
- Assign the pin at which LED is connected
- Code to change the state of the LED whenever the switch in our dashboard updates its state.
- Finally include the library for the DHT sensor, Assign a pin for the sensor and assign the temperature and humidity values to the cloud variables
To avoid any confusion I’m providing the full code for the main file, you can copy and replace your code.
/*
  Arduino IoT Cloud Variables description

  The following variables are automatically generated and updated when changes are made to the Thing

  CloudLight lED;
  CloudRelativeHumidity humidity;
  CloudTemperature temperature;

  Variables which are marked as READ/WRITE in the Cloud Thing will also have functions
  which are called when their values are changed from the Dashboard.
  These functions are generated with the Thing and added at the end of this sketch.
*/

#include "thingProperties.h"
#include "DHT.h"

#define onBoardLED 2
#define DHTPIN 18

#define DHTTYPE DHT22

DHT dht(DHTPIN, DHTTYPE);

void setup() {
  // Initialize serial and wait for port to open:
  Serial.begin(9600);
  dht.begin();

  pinMode(onBoardLED,OUTPUT);
  // This delay gives the chance to wait for a Serial Monitor without blocking if none is found
  delay(1500);

  // Defined in thingProperties.h
  initProperties();

  // Connect to Arduino IoT Cloud
  ArduinoCloud.begin(ArduinoIoTPreferredConnection);

  /*
     The following function allows you to obtain more information
     related to the state of network and IoT Cloud connection and errors
     the higher number the more granular information you’ll get.
     The default is 0 (only errors).
     Maximum is 4
 */
  setDebugMessageLevel(2);
  ArduinoCloud.printDebugInfo();
}

void loop() {
  ArduinoCloud.update();
  delay(1000);
  float h = dht.readHumidity();
  // Read temperature as Celsius (the default)
  float t = dht.readTemperature();

  temperature = t;
  humidity = h;

}


/*
  Since LED is READ_WRITE variable, onLEDChange() is
  executed every time a new value is received from IoT Cloud.
*/
void onLEDChange()  {
  if(lED == HIGH)
  {
    digitalWrite(onBoardLED,HIGH);
  }
  else
  {
    digitalWrite(onBoardLED,LOW);
  }
}
4. Uploading the code
To upload the code directly from the Arduino web editor we need to install the Arduino Create Agent. After installing the agent connect the ESP32/8266 to your computer then select the COM port and click the upload button.
5. Circuit
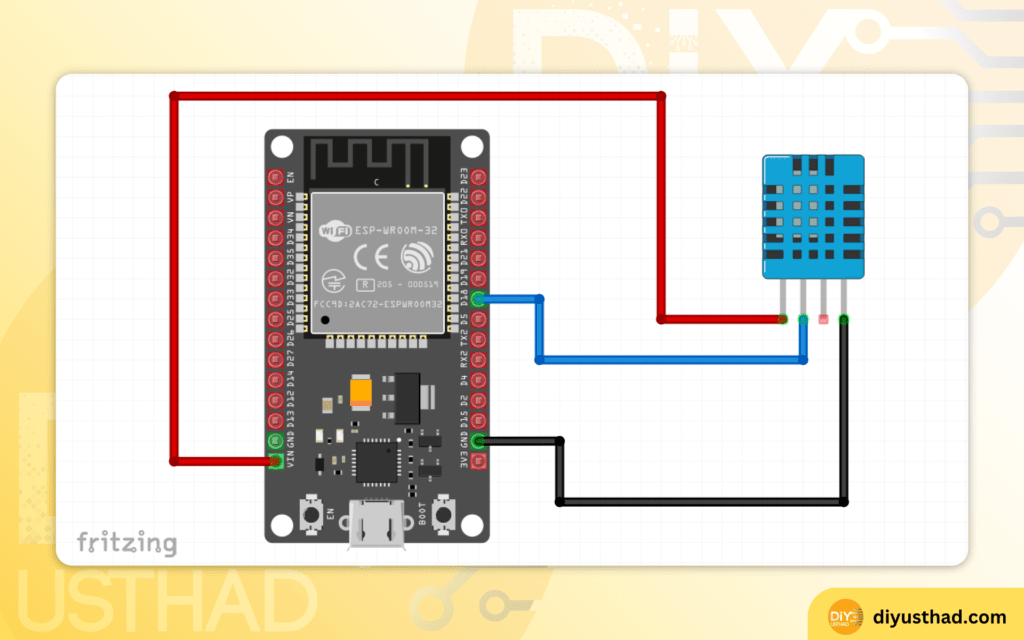
- Connect the VCC of DHT11 to the VIN of NodeMCU
- Connect the GND of DHT11 to the GND of NodeMCU
- Connect the Data pin of the DHT11 sensor to the D18 of NodeMCU
6. Creating a dashboard
As the final step, we need to create a dashboard to control the light and monitor the temperature and humidity readings. For that go to the dashboards tab and click on the Build Dashboard button

Now we will be presented with an interface to create our IoT dashboard. First, give a name for the dashboard then click on the ADD button and choose Switch.

Now give a name for the switch, here I have renamed it to LED Switch. Then click on the Link Variable button.
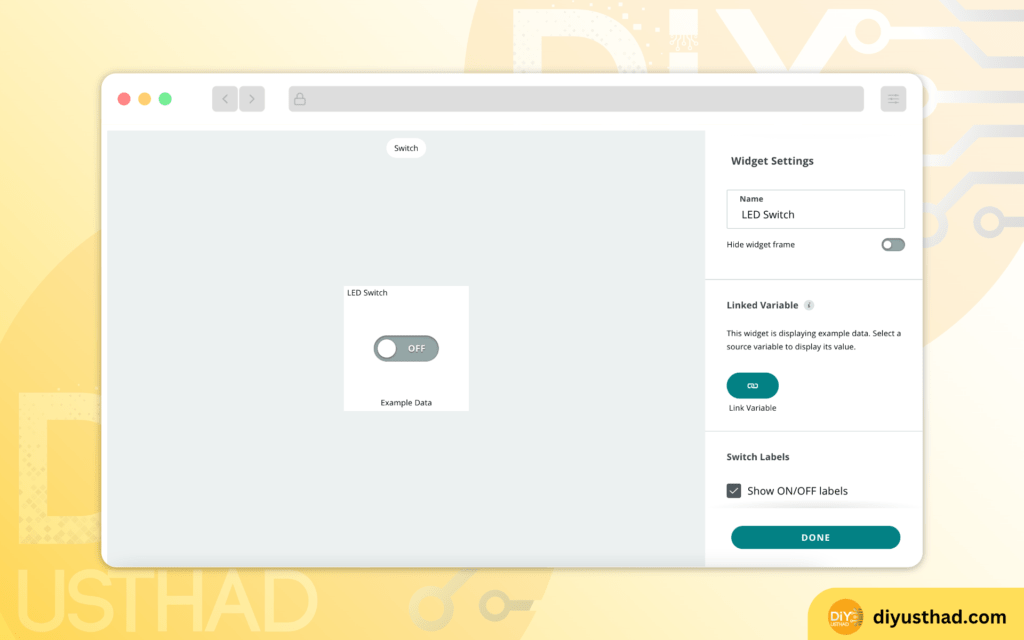
Now we can see all the 3 variables which we created, Choose LED and click Link Variable, and click Done. This will link the cloud variable LED to the LED Switch we created in the dashboard.

Now let’s add a Gauge widget to display the temperature, For that click on the Add button and search for gauge and select the gauge widget.

Now rename the widget to Temperature and click on the Link Variable button.
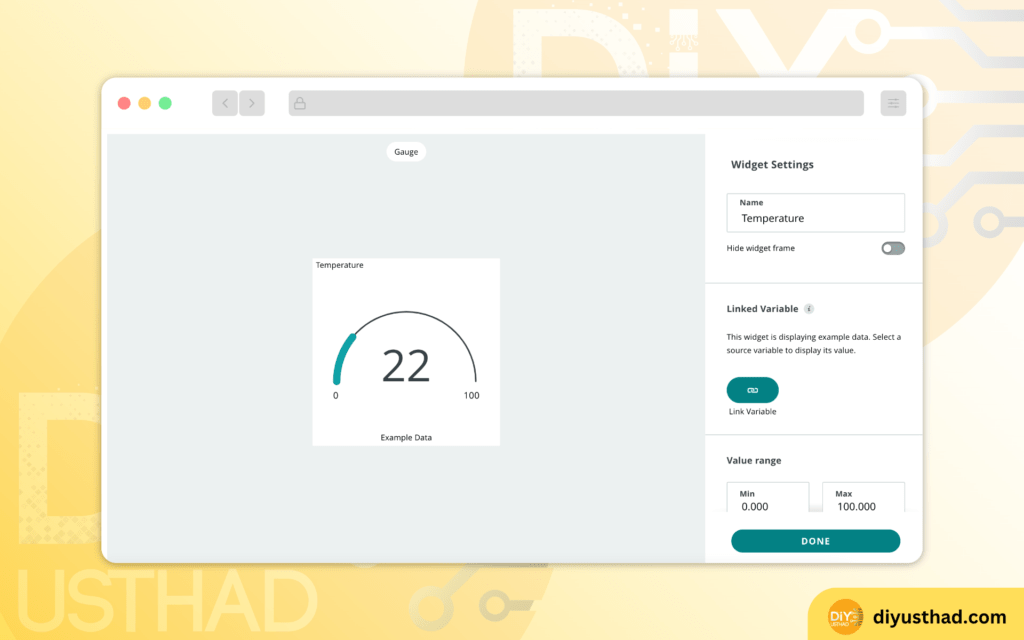
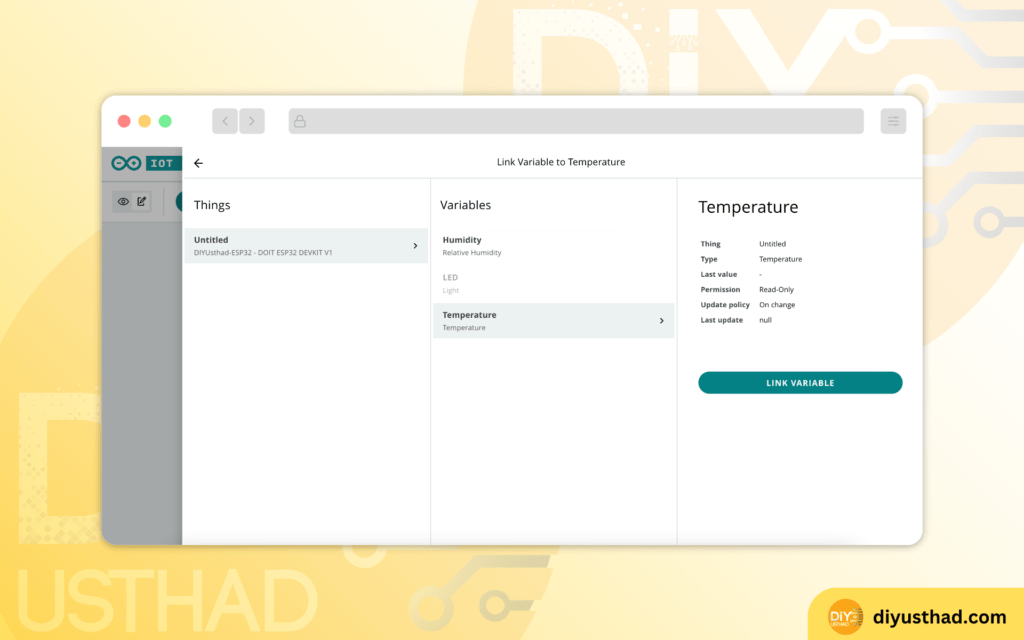
Now select the Temperature variable from the variables list and click on the link variable button and click done.
Now we need to do the same for humidity, here instead of a gauge widget we are using a percentage widget because the humidity is measured in percentage. Click on the Add button and search for the Percentage widget and select it.

Now rename the widget to Humidity and click Link Variable button.

Now select humidity from the variables list and click Link variable button and click done.

As you can see that all the 3 widgets are added to our dashboard.

Testing
Power up your ESP23/82666 and in no time you will be able to read the temperature and humidity measurements in your dashboard and also you will be able to turn ON/OFF the LED from your Arduino IoT Cloud Dashboard. Watch the below video to see it in action.