
LoRa (Long Range) is a wireless communication technology that operates at low power and has a long-range capability. It is ideal for IoT (Internet of Things) applications that require long-range communication with low battery usage. In this tutorial, we will be interfacing the LoRa module SX1278 with an Arduino Nano.

Components Required
To get started, you will need the following components:
| Components | DIY Usthad Store | Amazon.com | AliExpress |
|---|---|---|---|
| Arduino Nano | |||
| LoRa module SX1278 | |||
| Jumper wires | |||
| Breadboard |
Wiring
The wiring for the LoRa module SX1278 with Arduino Nano is straightforward. Follow these steps:
- Connect the VCC pin of the LoRa module to the 3.3V pin of the Arduino Nano.
- Connect the GND pin of the LoRa module to the GND pin of the Arduino Nano.
- Connect the SCK pin of the LoRa module to digital pin 13 of the Arduino Nano.
- Connect the MISO pin of the LoRa module to digital pin 12 of the Arduino Nano.
- Connect the MOSI pin of the LoRa module to digital pin 11 of the Arduino Nano.
- Connect the NSS pin of the LoRa module to digital pin 10 of the Arduino Nano.
- Connect the DIO0 pin of the LoRa module to digital pin 2 of the Arduino Nano.
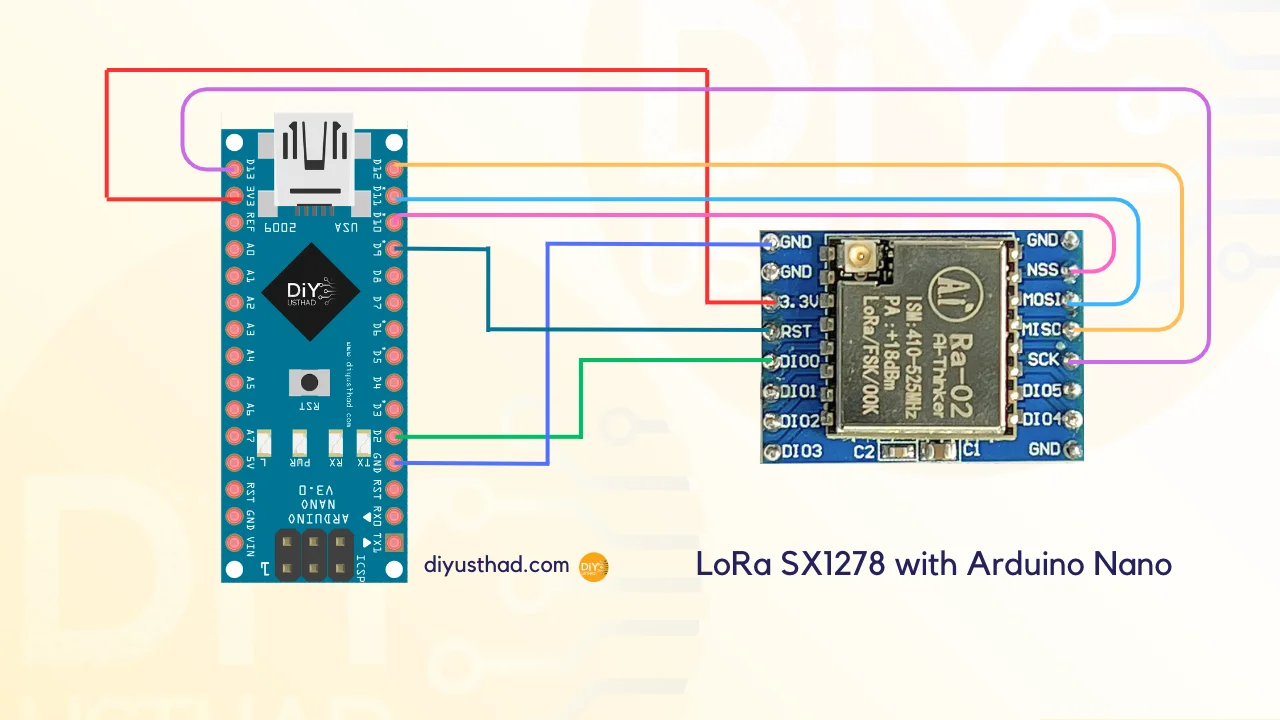
| LoRa SX1278 Module | Arduino Nano Board |
| 3.3V | 3.3V |
| Gnd | Gnd |
| En/Nss | D10 |
| G0/DIO0 | D2 |
| SCK | D13 |
| MISO | D12 |
| MOSI | D11 |
| RST | D9 |
Installing Libraries
Next, you need to install the LoRa library to work with the SX1278 module. To install the library, follow these steps:
- Open the Arduino IDE.
- Go to Sketch > Include Library > Manage Libraries.
- Search for “LoRa” in the search box.
- Select the “Arduino LoRa” library by Sandeep Mistry and click on Install.
Uploading the Code
Now that you have connected the LoRa module to the Arduino Nano and installed the required library, it is time to upload the code. Here is the sample code for testing the module:
Transmitter Side Code:
#include <SPI.h>
#include <LoRa.h>

void setup() {
  Serial.begin(9600);
  while (!Serial);

  if (!LoRa.begin(433E6)) {
    Serial.println("Starting LoRa failed!");
    while (1);
  }
}

void loop() {
  // send packet
  LoRa.beginPacket();
  LoRa.print("Hello World");
  LoRa.endPacket();

  delay(1000);
}
The code initializes the LoRa module and sends a message “Hello World” every 1 second.
After uploading the code, open the serial monitor in the Arduino IDE and set the baud rate to 9600. You should see the following output:
Starting LoRa
Hello World
Hello World
Hello World
...
This indicates that the LoRa module is working correctly and sending messages.
Receiver Side Code:
#include <SPI.h>
#include <LoRa.h>

void setup() {
  Serial.begin(9600);
  while (!Serial);

  if (!LoRa.begin(433E6)) {
    Serial.println("Starting LoRa failed!");
    while (1);
  }

  Serial.println("LoRa Receiver Started");
}

void loop() {
  // try to parse packet
  int packetSize = LoRa.parsePacket();
  if (packetSize) {
    // received a packet
    Serial.print("Received packet: '");

    while (LoRa.available()) {
      Serial.print((char)LoRa.read());
    }

    // print RSSI of packet
    Serial.print("' with RSSI ");
    Serial.println(LoRa.packetRssi());
  }
}
The receiver side code listens for any incoming packets from the transmitter. The LoRa.parsePacket() function checks if there are any incoming packets being sent over the LoRa module. If there is a packet available, the code reads the packet and prints it to the serial monitor using Serial.print((char) LoRa.read()).
Additionally, the RSSI (Received Signal Strength Indicator) of the packet is also printed using Serial.println(LoRa.packetRssi()). The RSSI provides information about the strength of the received signal, which can be useful in determining the distance between the transmitter and receiver.
By combining both the transmitter and receiver side code, you can establish a two-way communication link using LoRa technology.
Conclusion
In this tutorial, we learned how to interface the LoRa module SX1278 with an Arduino Nano. We also learned how to install the required library and uploaded the sample code to test the module. With this knowledge, you can now build your own IoT applications that require long-range communication with low battery usage using LoRa technology.