
My room light was controlled using a RF remote based relay. It was actually a dumb system always I miss place the remote and some times my son will take the remote and run.

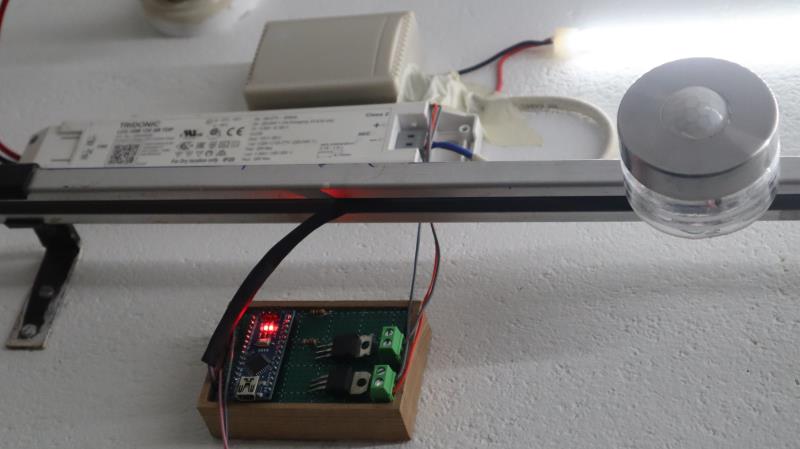
So today I am planning to put an end this struggle. In this project, we are going to make a PIR based motion sensor activated light and using an LDR (photoresistor) to automatically adjust the brightness of the light ie at night the light will be in full brightness and in the morning if the sunlight is low then the light will automatically turn on with a suitable brightness if motion is detected.
Video
Hardware Required
| Components | Amazon | AliExpress | Banggood |
|---|---|---|---|
| Arduino Nano | |||
| LDR (photoresistor) | |||
| PIR Motion Sensor | |||
| TIP120 Transistor |
Circuit
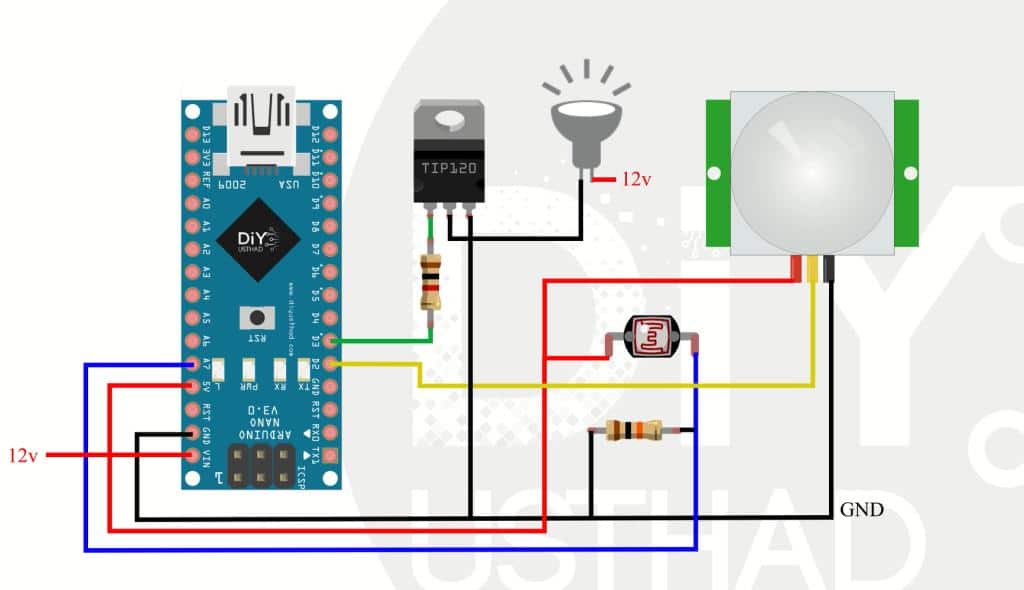
- Connect GND to Arduino GND, PIR GND, and Emitter of TIP120.
- Connect 5v to one of the terminals of LDR and VCC of PIR.
- Connect the other terminal of LDR to pin A7 of Arduino.
- Connect the OUT of PIR to pin D2 of Arduino
- Connect the Base of TIP120 to Arduino pin D3 via a 1k ohm 1/4w resistor.
- Connect a 10k ohm 1/4w resistor from pin A7 of Arduino to the GND.
- Finally, connect the negative of Light to the Collector of TIP120 and positive of Light directly to the 12v supply.
- Also, don’t forget to give power to Arduino.
Code
#define LDR A7
#define PIR 2
#define Light 3

int LDRvalue;
long counter;

void setup() {
  pinMode(PIR, INPUT);
  pinMode(Light, OUTPUT);
}

void loop() {
  if (digitalRead(PIR) == HIGH)
  {
    counter =0;
    LDRvalue = map(analogRead(LDR), 0, 1024, 254, 0);
    delay(50);
    analogWrite(Light,LDRvalue);
  }
  else
    counter++;
  if (counter <= 10000)
    digitalWrite(Light, LOW);
}
Yo, thanks for this!
Can this be done on tinkercad.com?
TIP120 is change with TIP122 transister as work or not
Yes it will work
Brother, can we do this without using transistor and resistors?
Hello, since you can set the PIR to stay HIGH for a defined time and range with the littles 2 potentiometers on the PIR, and with the jumper still on the sensor make it repeatable or not detective, i don’t rly see the point of the counter ( maybe i’m toatlly wrong)
It’s not better to say like :
void loop{
while (PIR == HIGH) {
stay high
}
stay low
}
plz send exact name of items in circuit