
In this tutorial, we are going to learn about how to use Light Dependent Resistor with Arduino and we are going to do a small project based on the LDR sensor.

What is LDR?
Light Dependent Resistor or Photoresistor, which is a passive electronic component, is basically a resistor that has a resistance that varies depending on the light intensity.
In the dark, a photoresistor can have a resistance as high as several megohms (MΩ), while in the light, a photoresistor can have a resistance as low as a few hundred ohms. If incident light on a photoresistor exceeds a certain frequency, photons absorbed by the semiconductor give bound electrons enough energy to jump into the conduction band. The resulting free electrons (and their hole partners) conduct electricity, thereby lowering resistance. The resistance range and sensitivity of a photoresistor can substantially differ among dissimilar devices. Moreover, unique photoresistors may react substantially differently to photons within certain wavelength bands.
Video
What we are going to do!
We are going to connect an LED and a Photoresistor(Light Dependent Resistor or LDR) with an Arduino and program it to respond according to the light in the room.
If the room is dark then the LED will turn ON and if the room is bright then the LED will turn OFF.
Hardware Required
| Components | Amazon.com | Banggood.com | AliExpress | Utsource |
|---|---|---|---|---|
| Arduino UNO | ||||
| Photoresistor/LDR | ||||
| LED | ||||
| Resistor(10k,220ohm) |
Circuit
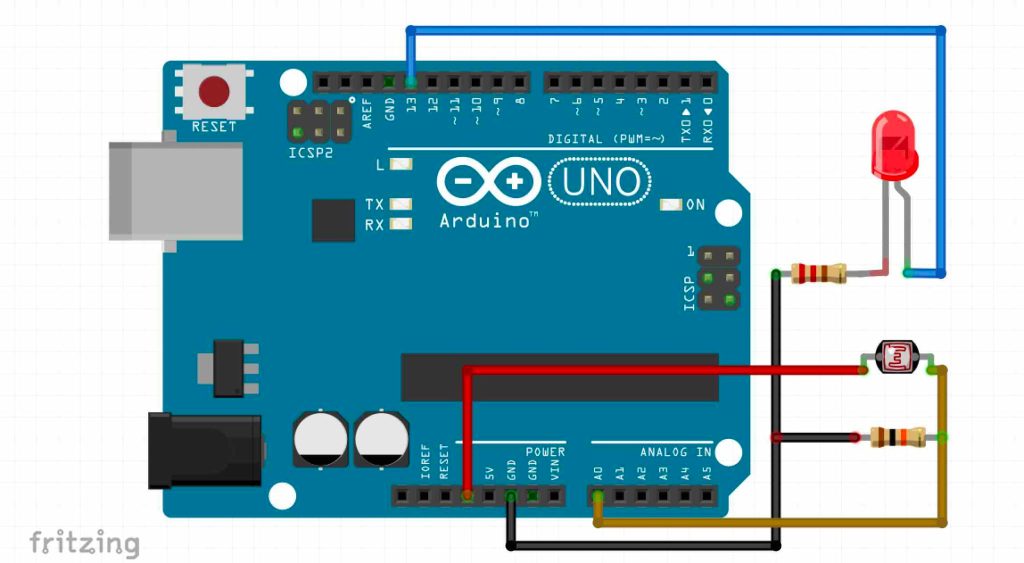
- Connect the A0 analog pin of Arduino to any pin of the LDR.
- Connect the other pin of LDR to the 3v of Arduino.
- Then connect the 10k resistor from GND to A0 of Arduino.
- Connect the GND of LED to the GND of Arduino via 220 Ohm resistor and
- Finally, connect the anode of the LED to the 13th pin of Arduino.
Code
//https://diyustahd.com
//https://youtube.com/diyusthad

const int ledPin = 13; //pin at which LED is connected

const int ldrPin = A0; //pin at which LDR is connected

int threshold = 600;

void setup() {

  Serial.begin(9600);

  pinMode(ledPin, OUTPUT); //Make LED pin as output

  pinMode(ldrPin, INPUT); //Make LDR pin as input

}

void loop()
{

  int ldrStatus = analogRead(ldrPin); //saving the analog values received from LDR

  if (ldrStatus <= threshold) //set the threshold value below at which the LED will turn on
  { //you can check in the serial monior to get approprite value for your LDR

    digitalWrite(ledPin, HIGH);  //Turing LED ON

    Serial.print("Its DARK, Turn on the LED : ");

    Serial.println(ldrStatus);

  }

  else

  {

    digitalWrite(ledPin, LOW); //Turing OFF the LED

    Serial.print("Its BRIGHT, Turn off the LED : ");

    Serial.println(ldrStatus);

  }

}
- Upload the above code and open the serial monitor.
- Now you will be able to see some values are printing in the serial monitor, cover the LDR with your hand or turn off the light in your room.
- Now the values will be decreasing, note down the current value.
- Go to the done and change the value of the threshold to the noted value in the previous step.
- Now upload the code again.
- Now, whenever the value goes below the threshold value then the LED will turn ON.
- You can replace the LED with some relay for controlling heavy loads.
To buy electronic components order from UTSOURCE
You can build a variety of Arduino-based projects. Arduino-based CNC pen plotter, floor cleaning robot, line follower robot, 2D wire bender are best project for beginner.