
Mosquitto is a lightweight and widely used MQTT broker for handling communication between IoT devices. By default, Mosquitto allows local connections, but for remote access, extra steps are needed to ensure secure communication. This guide will show you how to enable remote access and set up authentication to protect your broker from unauthorized access.

Prerequisites
- A server or device with Mosquitto installed (e.g., Raspberry Pi or a Linux server).
- Basic knowledge of terminal commands.
- Mosquitto version 2.x or later (for enhanced security features).
Step 1: Allow Remote Access
By default, Mosquitto listens only on localhost. To enable remote access:
1.1 Create Custom Configuration File
- Create a Custom Configuration File: Open a terminal and use your favorite text editor to create a new file in
/etc/mosquitto/conf.d/
For example:sudo nano /etc/mosquitto/conf.d/custom.conf - Add the following lines:
listener 1883allow_anonymous falselistener 1883allow_anonymous false
- Save and exit the file by pressing
CTRL + X, thenY, andEnter.

1.2 Restart the Mosquitto Service
Apply the changes by restarting Mosquitto:
sudo systemctl restart mosquitto
1.3 Verify the Port is Open
Check if Mosquitto is listening on port 1883:
sudo netstat -tuln | grep 1883

Step 2: Enable Authentication
Authentication ensures that only authorized users can connect to the broker.
2.1 Create a Password File
Use the Mosquitto password file utility to create credentials:
sudo mosquitto_passwd -c /etc/mosquitto/passwd username
Replace username with your desired username. You’ll be prompted to enter a password.

To add more users later, run:
sudo mosquitto_passwd /etc/mosquitto/passwd another_user
2.2 Update the Configuration File
Edit the custom configuration file to include the password file:
sudo nano /etc/mosquitto/conf.d/custom.conf
Add this line:
password_file /etc/mosquitto/passwd

2.3 Restart the Mosquitto Service
Restart Mosquitto to apply the changes:
sudo systemctl restart mosquitto
Step 3: Test Remote Access
3.1 Install an MQTT Client
Use an MQTT client like MQTT Explorer or the command-line utility mosquitto_pubmosquitto_sub
3.2 Test Publishing and Subscribing
- From a remote device installed with the MQTT client, publish a message:
mosquitto_pub -h broker_ip -p 1883 -u username -P password -t "test/topic" -m "Hello, MQTT!" - From another device installed with the MQTT client, subscribe to the same topic:
mosquitto_sub -h broker_ip -p 1883 -u username -P password -t "test/topic"
Replace broker_ip with your broker IP address, username with your username, and password with your password.
You should see the published message “Hello, MQTT!” on the subscriber.
3.3 Testing with Mobile App
Or, you can use 2 mobile phones installed with any MQTT Checker app and test, follow the below steps,
- Install My MQTT app, available in Android & IOS
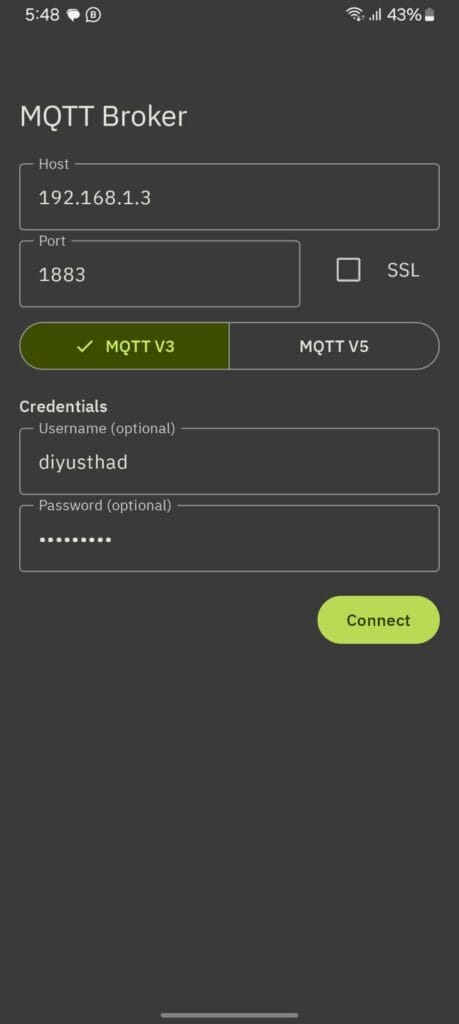
- Now from both phones connect to your MQTT Broker using the IP, Username, Password, and Port(1883 by default)
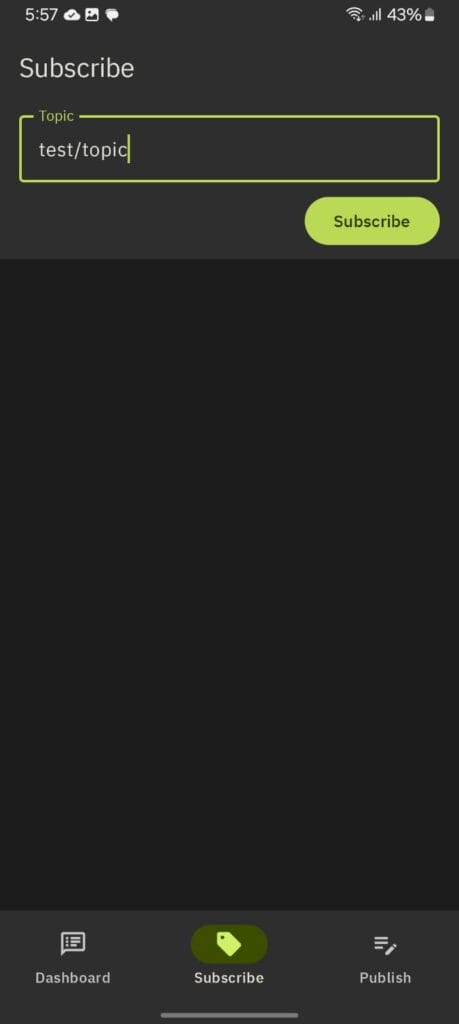
- Now from phone_1 go to the subscribe tab and enter the topic as
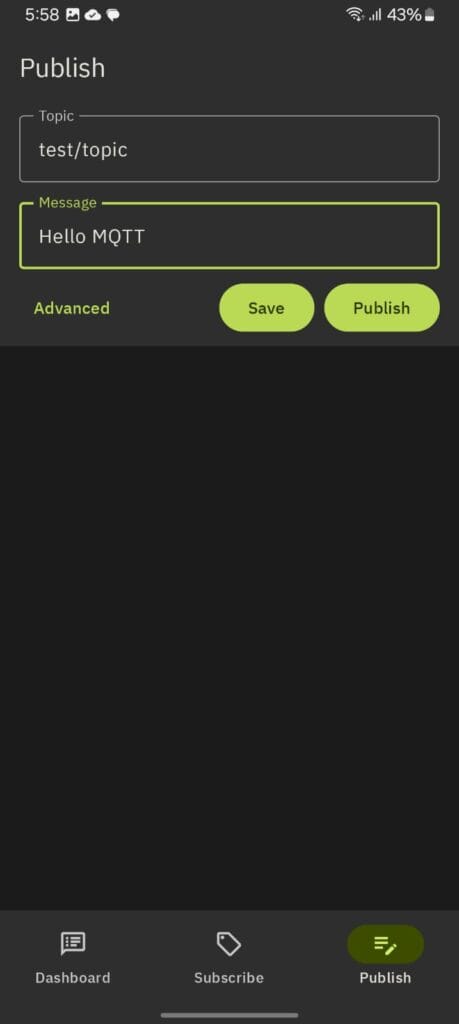
test/topic - On the phone_2 go to publish tab and enter the topic as
test/topic& Message asHello MQTTand click on the Publish button.
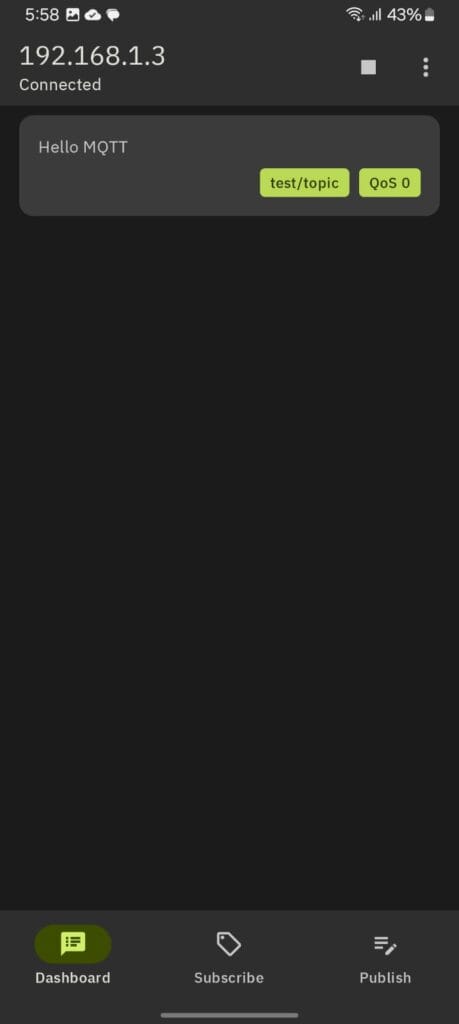
- Now, in the dashboard tab of phone 1 you can see the message “Hello MQTT” received from the other phone
Step 4: Secure Your Connection with SSL (Optional but Recommended)
To further enhance security, enable SSL/TLS for encrypted communication:
- Generate SSL certificates using tools like
opensslor obtain them from a Certificate Authority. - Update the configuration file to include the certificate and key paths: listener
8883 cafile /path/to/ca.crt certfile /path/to/server.crt keyfile /path/to/server.key - Restart Mosquitto:
sudo systemctl restart mosquitto - Use MQTT clients supporting SSL to connect via port 8883.
Troubleshooting Tips
- Error: Connection Refused
- Ensure the firewall allows port 1883 (and 8883 if SSL is enabled):
sudo ufw allow 1883 sudo ufw allow 8883 - Check the Mosquitto logs for detailed errors:
sudo journalctl -u mosquitto
- Ensure the firewall allows port 1883 (and 8883 if SSL is enabled):
- Authentication Fails
- Ensure the username and password are correct.
- Verify the
password_filepath is correct in the configuration file.
Conclusion
By enabling remote access and authentication, you ensure that your Mosquitto broker is accessible yet secure. Adding SSL/TLS further strengthens your setup by encrypting the communication. With this setup, you’re ready to manage IoT devices securely and efficiently!