
If you are an Arduino enthusiast, you may have encountered this frustrating error message when trying to upload your sketch to your board:

avrdude: stk500_recv(): programmer is not responding
avrdude: stk500_getsync() attempt 1 of 10: not in sync: resp=0x00
…
This error basically means that something is wrong with the communication between your computer and the Arduino. It can be caused by a variety of factors, such as hardware, software, drivers, settings, etc.
In this blog post, I will share some common solutions that may help you fix this issue and get back to your Arduino projects.
Check your board and port selection
The first thing you should do is to make sure that you have selected the right board and port in the Arduino IDE. Go to Tools > Board and choose the board that matches your model. For example, if you have an Arduino Uno, select Arduino Uno.
Then, go to Tools > Port and choose the port that your board is connected to. The port name may vary depending on your operating system and board type, but it usually starts with COM (Windows), /dev/tty (Linux) or /dev/cu (Mac OS). You may also see the board name next to the port name.
If you don’t see any port or your board name in the port menu, it means that your computer is not recognizing your board. This could be due to a faulty USB cable, a damaged USB port, a missing driver, or a permission issue. Try the following steps to troubleshoot:
- Try a different USB cable and make sure it is a data transfer cable, not a charge-only cable.
- Try a different USB port on your computer or a different computer if possible.
- Avoid using a USB hub or extension cable if possible, or try a different hub.
- Make sure you have installed the latest drivers for your board. You can find them on the official Arduino website or in the Boards Manager in the Arduino IDE.
- If you are using Linux or Mac OS, you may need to grant permission to access the port. You can do this by running the following commands in the terminal:
sudo usermod -a -G dialout $USER
sudo chmod a+rw /dev/ttyACM0
Replace /dev/ttyACM0 with the port name of your board. You may need to log out and log back in for the changes to take effect.
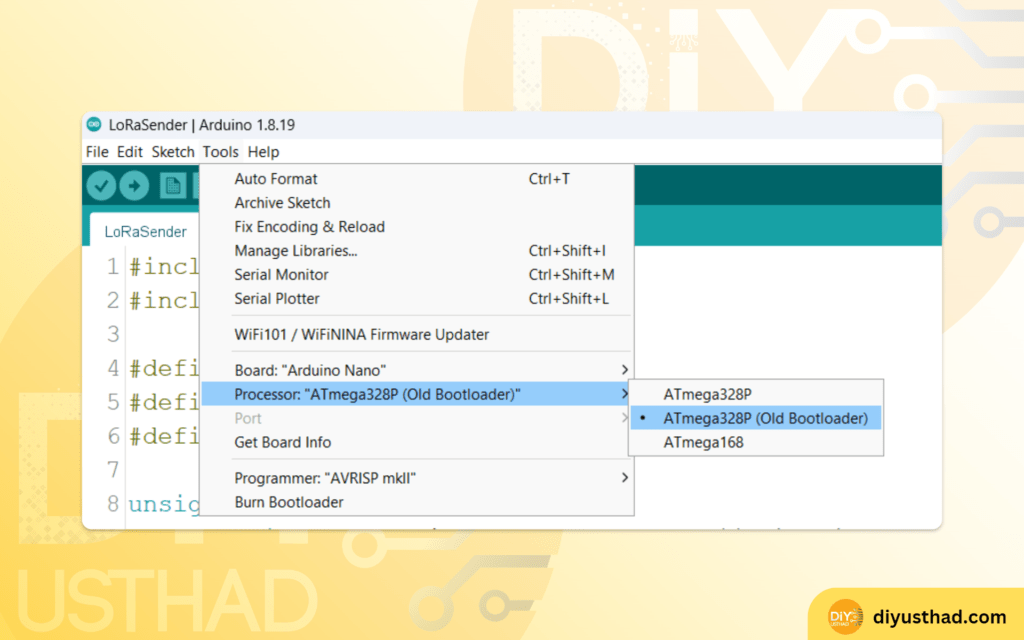
Choose the right Processor
If you have an Arduino Nano board manufactured before January 2018, simply selecting “Processor > ATmega328P (Old Bootloader)” will resolve the issue.
- Open the Arduino IDE.
- Go to “Tools” and select “Processor.”
- Change the processor from “ATmega328P” to “ATmega328P (Old Bootloader).“
Reset your board
Sometimes, resetting your board can help to establish a proper connection with your computer. To reset your board, press the reset button on your board (a white or blue push button) before or during the upload process. You may need to experiment with the timing of pressing the reset button, as different boards have different bootloaders that require different delays.
Another way to reset your board is to use a loopback test. This is a method of testing the serial communication of your board by connecting the TX and RX pins (pin 0 and pin 1) with a jumper wire. This will create a feedback loop that will echo back any data sent from your computer to your board. To perform a loopback test, follow these steps:
- Disconnect your board from your computer.
- Connect a jumper wire between pin 0 and pin 1 on your board.
- Reconnect your board to your computer and open the Serial Monitor in the Arduino IDE.
- Make sure the baud rate matches the one in your sketch (usually 9600) and select “No line ending”.
- Type some text in the input box and press send. You should see the same text echoed back in the output box.
- If you see the text echoed back, it means that your serial communication is working fine and you can remove the jumper wire.
- If you don’t see the text echoed back, it means that there is something wrong with your serial chip or driver and you may need to replace or reprogram your board.
Reprogram your bootloader
The bootloader is a small program that runs on your board when it is powered on or reset. It allows you to upload sketches from your computer to your board without using an external programmer. Sometimes, the bootloader can get corrupted or overwritten by other programs and cause communication errors.
To fix this, you need to reprogram or burn the bootloader on your board using another Arduino as an ISP (In-circuit Serial Programmer). This process will erase everything on your board and restore it to its factory settings. To burn the bootloader, follow these steps:
- Connect another working Arduino board (the programmer) to your computer and upload the ArduinoISP sketch from File > Examples > 11.ArduinoISP > ArduinoISP.
- Connect the programmer board to the target board (the one with the error) using jumper wires as shown in this diagram:
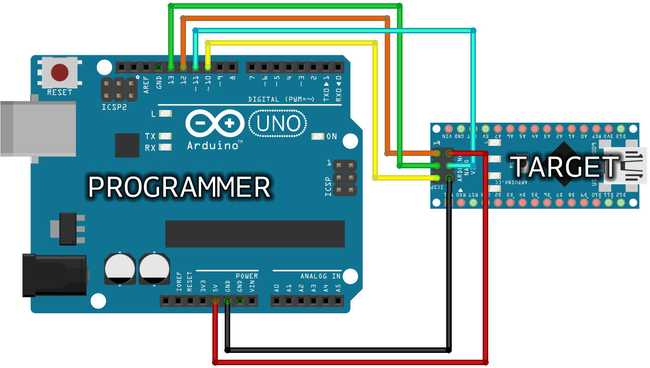
- Make sure you have selected the right board and port for the programmer board in the Arduino IDE.
- Go to Tools > Programmer and select Arduino as ISP.
- Go to Tools > Burn Bootloader and wait for the process to finish. You should see a message saying “Done burning bootloader” in the status bar.
- Disconnect the jumper wires and the programmer board from the target board and try uploading your sketch again.
Conclusion
I hope this blog post has helped you to solve the avrdude: stk500_recv(): programmer is not responding error and upload your sketch successfully. If you have any questions or suggestions, feel free to leave a comment below. Happy Arduino-ing!
Thank you so much changing processor to old did the trick for me!