
Introduction
In this project, we are going to make a web server in ESP32 with an interactive web page to control the color and brightness of a 12-volt RGB LED strip.

Video
Hardware Used
| Components | Amazon.com | Banggood | AliExpress | Utsource |
| ESP32 or |  | | | |
| ESP8266 | | | | |
| Bread Board | | | | |
| TIP120 | | | | |
| 10k Resistor | | | | |
| RGB LED Strip | | | |
Choose the transistor according to the current consumption of the LED strip you are using
Software Needed
| Arduino IDE |
Working Theory
A five-meter 12 volt RGB LED strip has been connected to an ESP32 NodeMCU board because the NodeMCU board cannot directly drive the LED strip we have used an NPN transistor(TIP120) to drive the LED strip from the NodeMCU. The transistors are connected to the PWM supported pins of the ESP32 development board each for red, green, and blue lines of the LED strip.
In the coding part, we created a web server with a small and lightweight web page that will load in the browser when we type the IP address of our ESP32. The web page contains some buttons to turn on/off each color and there are also buttons for mixing the red, green, and blue colors to make any color combination.
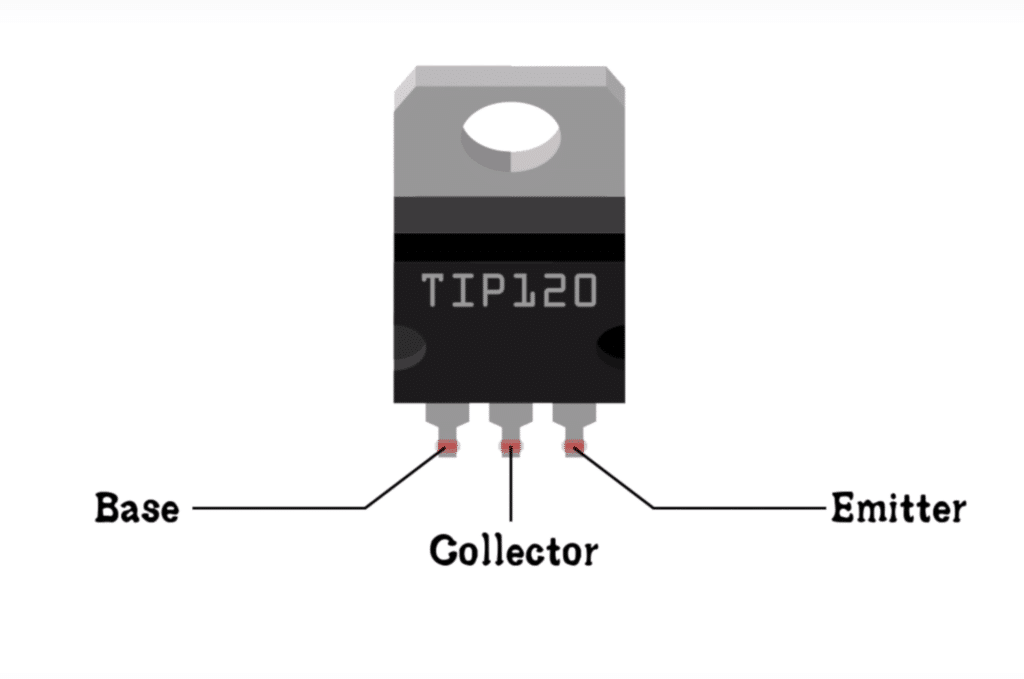
TIP120 Pinout Diagram
Circuit

- Connect the R, G & B terminals of the LED strip to the collector of the transistor as shown.
- Through a 10Kohm resistance connect the base of the transistors to the D25, D26 & D27 pins of the ESP32 NodeMCU.
- All the grounds have to be connected together as shown, the ground of ESP32, the ground of transistors, and the ground of the 12v power supply used for the RGB LED strip.
- You can power the NodeMCU board either through the USB cable or through the VIN terminal.
Code
// Load Wi-Fi library
#include <WiFi.h>
#include <analogWrite.h>

// Replace with your network credentials
const char* ssid     = "Your_SSID";
const char* password = "Your_Paswd";

// Set web server port number to 80
WiFiServer server(80);

// Variable to store the HTTP request
String header;

// Assign output variables to GPIO pins
const int redPin = 26;
const int greenPin = 27;
const int bluePin = 25;

int greenValue = 0;
int redValue = 0;
int blueValue = 0;

String redValueString = String(redValue);
String greenValueString = String(greenValue);
String blueValueString = String(blueValue);

void setup() {
  Serial.begin(115200);

  // Connect to Wi-Fi network with SSID and password
  Serial.print("Connecting to ");
  Serial.println(ssid);
  WiFi.begin(ssid, password);
  while (WiFi.status() != WL_CONNECTED) {
    delay(500);
    Serial.print(".");
  }
  // Print local IP address and start web server
  Serial.println("");
  Serial.println("WiFi connected.");
  Serial.println("IP address: ");
  Serial.println(WiFi.localIP());
  server.begin();

  analogWriteResolution(8);
}

void loop(){
  WiFiClient client = server.available();   // Listen for incoming clients

  if (client) {                             // If a new client connects,
    Serial.println("New Client.");          // print a message out in the serial port
    String currentLine = "";                // make a String to hold incoming data from the client
    while (client.connected()) {            // loop while the client's connected
      if (client.available()) {             // if there's bytes to read from the client,
        char c = client.read();             // read a byte, then
        Serial.write(c);                    // print it out the serial monitor
        header += c;
        if (c == '\n') {                    // if the byte is a newline character
          // if the current line is blank, you got two newline characters in a row.
          // that's the end of the client HTTP request, so send a response:
          if (currentLine.length() == 0) {
            // HTTP headers always start with a response code (e.g. HTTP/1.1 200 OK)
            // and a content-type so the client knows what's coming, then a blank line:
            client.println("HTTP/1.1 200 OK");
            client.println("Content-type:text/html");
            client.println("Connection: close");
            client.println();

            if(header.indexOf("GET /-r") >=0 ) redValue -=1;
            else if(header.indexOf("GET /+r") >=0) redValue +=1;
            else if(header.indexOf("GET /+g") >=0) greenValue +=1;
            else if(header.indexOf("GET /-g") >=0) greenValue -=1;
            else if(header.indexOf("GET /+b") >=0)  blueValue +=1;
            else if(header.indexOf("GET /-b") >=0) blueValue -=1;
            else if(header.indexOf("GET /Red") >=0) if(redValue == 0) redValue = 254; else redValue = 0;
            else if(header.indexOf("GET /Green") >=0) if(greenValue == 0) greenValue = 254; else greenValue = 0;
            else if(header.indexOf("GET /Blue") >=0) {if(blueValue == 0) blueValue = 254; else blueValue = 0;}


            analogWrite(redPin,redValue);
            analogWrite(bluePin,blueValue);
            analogWrite(greenPin,greenValue);

            redValueString = String(redValue);
            greenValueString = String(greenValue);
            blueValueString = String(blueValue);

            // Display the HTML web page
            client.println("<!DOCTYPE html><html>");
            client.println("<head><meta name=\"viewport\" content=\"width=device-width, initial-scale=1\">");
            client.println("<link rel=\"icon\" href=\"data:,\">");
            // CSS to style the on/off buttons
            client.println("<link rel=\"stylesheet\" href=\"https://maxcdn.bootstrapcdn.com/bootstrap/3.4.0/css/bootstrap.min.css\">");

            client.println("</head>");

            // Web Page Heading

            client.println("<center>");
            client.println("<body><h1>ESP32 RGB Web Server</h1>");
            client.println("<br>");

            client.println("<a href = \" /+r \" ");
            if(redValue == 254)
            client.println("<button type=\"button\" class=\"btn btn-primary btn-md disabled\">+</button>");
            else
            client.println("<button type=\"button\" class=\"btn btn-primary btn-md\">+</button>");
            client.println("</a>");

            client.println("<a href = \" /Red\" ");
            client.println("<button type=\"button\" class=\"btn btn-primary btn-md\">RED(" + redValueString + ")</button>");
            client.println("</a>");

            client.println("<a href = \" /-r \" ");
            if(redValue == 0)
            client.println("<button type=\"button\" class=\"btn btn-primary btn-md disabled\">-</button>");
            else
            client.println("<button type=\"button\" class=\"btn btn-primary btn-md\">-</button>");
            client.println("</a>");

            client.println("<br>");
            client.println("<br>");

            client.println("<a href = \" /+g \" ");
            if(greenValue == 254)
            client.println("<button type=\"button\" class=\"btn btn-primary btn-md disabled\">+</button>");
            else
            client.println("<button type=\"button\" class=\"btn btn-primary btn-md\">+</button>");
            client.println("</a>");

            client.println("<a href = \" /Green \" ");
            client.println("<button type=\"button\" class=\"btn btn-primary btn-md\">GREEN(" + greenValueString + ")</button>");
            client.println("</a>");

            client.println("<a href = \" /-g \" ");
            if(greenValue == 0)
            client.println("<button type=\"button\" class=\"btn btn-primary btn-md disabled\">-</button>");
            else
            client.println("<button type=\"button\" class=\"btn btn-primary btn-md\">-</button>");
            client.println("</a>");

            client.println("<br>");
            client.println("<br>");

            client.println("<a href = \" /+b \" ");
            if(blueValue == 254)
            client.println("<button type=\"button\" class=\"btn btn-primary btn-md disabled\">+</button>");
            else
            client.println("<button type=\"button\" class=\"btn btn-primary btn-md\">+</button>");
            client.println("</a>");

            client.println("<a href = \" /Blue \" ");
            client.println("<button type=\"button\" class=\"btn btn-primary btn-md\">BLUE(" + blueValueString + ")</button>");
            client.println("</a>");

            client.println("<a href = \" /-b \" ");
            if(blueValue == 0)
            client.println("<button type=\"button\" class=\"btn btn-primary btn-md disabled\">-</button>");
            else
            client.println("<button type=\"button\" class=\"btn btn-primary btn-md\">-</button>");
            client.println("</a>");

            client.println("<center>");
            client.println("</body></html>");


            // The HTTP response ends with another blank line
            client.println();
            // Break out of the while loop
            break;
          } else { // if you got a newline, then clear currentLine
            currentLine = "";
          }
        } else if (c != '\r') {  // if you got anything else but a carriage return character,
          currentLine += c;      // add it to the end of the currentLine
        }
      }
    }
    // Clear the header variable
    header = "";
    // Close the connection
    client.stop();
    Serial.println("Client disconnected.");
    Serial.println("");
  }
}
Pros & Cons Of Current Implementation
Pros
- Easy for beginners to understand the concept and code.
- Only HTML and CSS are used for the webpage.
Cons
- Webpage refresh every time a button is pressed.
What’s On Next Update
- Implementing
javascript for the web page to avoid full reload of the page when the buttons are clicked. - Storing the code for
web page inPROGRAM memory instead of flash memory. - Soft-coded WiFi credentials with WiFi manager.
- Access point when no WiFi network is found.
- So, subscribe to our mailing list to not to miss the update
You might also like…
To buy electronic components order from UTSOURCE
Hi. I am new to using this ESP32 and arduino. I put your code into the arduino ide, and it fails to verify. Cannot find the include file, analogWrite.h