
In this project, we are going to make an (Internet of Things) IoT display using an LCD 16×2 and an ESP32 NodeMCU development board. For transferring the data to the ESP32 board we are going to use a Telegram bot so that whenever we need to update the content on our LCD display we just need to open the telegram messenger and send a message to our bot.


Hardware Required
| Components | Amazon.com | AliExpress | Banggood |
|---|---|---|---|
| ESP32 NodeMCU | |||
| LCD Display 16×2 | |||
| LCD i2c converter module |
Circuit
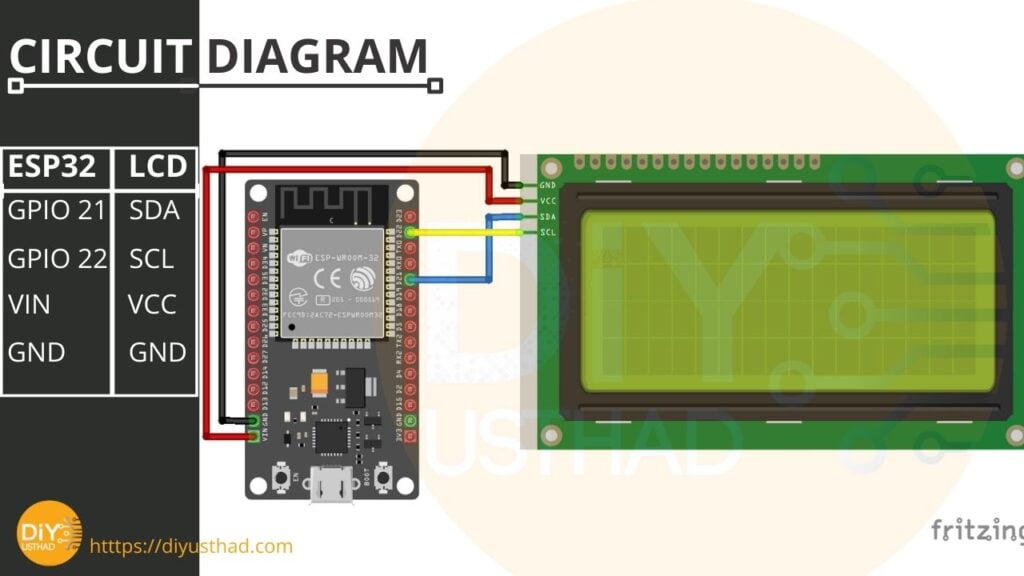
| ESP32 (NodeMCU) | LCD 16×02 (with I2C) |
|---|---|
| GPIO 21 (SDA) | SDA |
| GPIO 22 (SCL) | SCL |
| GND | GND |
| VIN | VCC |
Libraries Used
| Libraries | GitHub |
|---|---|
| LiquidCrystal_I2C Library by Marco Schwartz | |
| Telegram Bot Library | |
| ArduinoJson Library |
Installing the LiquidCrystal_I2C Library
Telegram Bot Library
To establish communication with the Telegram bot, we’ll be using the Universal Telegram Bot Library created by Brian Lough that provides an easy interface for Telegram Bot API.
Follow the next steps to install the latest release of the library.
1. Click this link to download the Universal Arduino Telegram Bot library.
2. Go to Sketch > Include Library > Add.ZIP Library...
3. Add the library you’ve just downloaded. And that’s it. The library is installed.
For details about the library, you can check out the Universal Arduino Telegram Bot Library GitHub page.
ArduinoJson Library
We also have to install the ArduinoJson library. Follow the next steps to install the library.
1. Go to Sketch > Include Library > Manage Libraries.
2. Search for “ArduinoJson”.
3. Select the latest version available.
4. Install the library.
Note
The versions of libraries used while making this tutorial is,
ArduinoJSON – 6.18.5
Telegram Bot – 1.3.0
LiquidCrystal_I2C – 1.1.2
Programming
Before starting the coding of ESP32 we need to create a telegram bot and get the bot credentials like the bot token and telegram user ID.
In our previous tutorial, we have clearly explained how to make a bot and fetch the details. So if you don’t know how to create a bot in telegram follow the below tutorial.
So we hope you have successfully created a telegram bot and got the bot token and user ID by following the above tutorial. Now follow the below steps,
- Copy the below code to your Arduino IDE.
- Replace the text in the code with your WiFi SSID, WiFi password, Bot token and User ID where it is mentioned in the code.
- Now upload the code to your ESP32 development board, don’t forget to choose the right board and port.
Code
/*********
  Diyusthad
  Complete project details at https://diyusthad.com
*********/

#include <LiquidCrystal_I2C.h>

// set the LCD number of columns and rows
int lcdColumns = 16;
int lcdRows = 2;

LiquidCrystal_I2C lcd(0x27, lcdColumns, lcdRows);
// if you don't know your display's I2C address, run an I2C scanner sketch
// set LCD address, number of columns and rows

#include <WiFi.h>
#include <WiFiClientSecure.h>
#include <UniversalTelegramBot.h>

// Wifi network station credentials
#define WIFI_SSID "YOUR WIFI SSID"
#define WIFI_PASSWORD "YOUR WIFI PASSWORD"
// Telegram BOT Token (Get from Botfather)
#define BOT_TOKEN "YOUR TELEGRAM BOT TOKEN"
#define CHAT_ID "YOUR TELEGRAM CHAT ID"

const unsigned long BOT_MTBS = 1000; // mean time between scan messages

WiFiClientSecure secured_client;
UniversalTelegramBot bot(BOT_TOKEN, secured_client);
unsigned long bot_lasttime; // last time messages' scan has been done

void handleNewMessages(int numNewMessages)
{
  Serial.print("handleNewMessages ");
  Serial.println(numNewMessages);

  for (int i = 0; i < numNewMessages; i++)
  {
    String chat_id = String(bot.messages[i].chat_id);
    if (chat_id != CHAT_ID )
    {
      bot.sendMessage(chat_id, "Unauthorized user", "");
    }
    else
    {
      String text = bot.messages[i].text;

      String from_name = bot.messages[i].from_name;
      if (from_name == "")
        from_name = "Guest";

      if (text == "/start")
      {
        String welcome = "Welcome to ESP32 IoT display, " + from_name + ".\n";
        welcome += "Just type your message and send .\n\n";
        bot.sendMessage(chat_id, welcome, "Markdown");
      }
      else
      {
        lcd.clear();
        lcd.setCursor(0, 0);
        lcd.print(text);
      }
    }
  }
}

void setup() {
  // initialize LCD
  lcd.init();
  // turn on LCD backlight
  lcd.backlight();

  Serial.begin(115200);
  Serial.println();

  // attempt to connect to Wifi network:
  Serial.print("Connecting to Wifi SSID ");
  Serial.print(WIFI_SSID);
  WiFi.begin(WIFI_SSID, WIFI_PASSWORD);
  secured_client.setCACert(TELEGRAM_CERTIFICATE_ROOT); // Add root certificate for api.telegram.org
  while (WiFi.status() != WL_CONNECTED)
  {
    Serial.print(".");
    delay(500);
  }
  Serial.print("\nWiFi connected. IP address: ");
  Serial.println(WiFi.localIP());

}

void loop() {

  if (millis() - bot_lasttime > BOT_MTBS)
  {
    int numNewMessages = bot.getUpdates(bot.last_message_received + 1);

    while (numNewMessages)
    {
      Serial.println("got response");
      handleNewMessages(numNewMessages);
      numNewMessages = bot.getUpdates(bot.last_message_received + 1);
    }

    bot_lasttime = millis();
  }
}
Testing
- Open the serial monitor and change the baud rate to 115200.
- Now wait for few seconds for the Wifi to be connected, when its connected then the IP address of the ESP32 will be printed on to the serial monitor. If its not connecting then check the WiFi SSID and Password which we hard coded into the Arduino code.
- Then open the telegram messenger. Now open the bot we created and send any text and it will be displayed on to the LCD display, As you can see in the below video.
- Thats it guys we have successfully made an IoT Display.
Video
Conclusion
This project is just the tip of the iceberg, if we think creatively there is a wide range of applications using ESP32/ESP8266 and telegram bot.
Excellent travail, merci beaucoup;
Code for esp8266 nodemcu without error
/*********
Diyusthad
Complete project details at https://diyusthad.com
*********/
#include
// set the LCD number of columns and rows
int lcdColumns = 16;
int lcdRows = 2;
LiquidCrystal_I2C lcd(0x27, lcdColumns, lcdRows);
// if you don’t know your display’s I2C address, run an I2C scanner sketch
// set LCD address, number of columns and rows
#ifdef ESP32
#include
#else
#include
#endif
#include
#include
#include
// Wifi network station credentials
#define WIFI_SSID “YOUR WIFI SSID”
#define WIFI_PASSWORD “YOUR WIFI PASSWORD”
// Telegram BOT Token (Get from Botfather)
#define BOT_TOKEN “YOUR TELEGRAM BOT TOKEN”
#define CHAT_ID “YOUR TELEGRAM CHAT ID”
#ifdef ESP8266
X509List cert(TELEGRAM_CERTIFICATE_ROOT);
#endif
const unsigned long BOT_MTBS = 1000; // mean time between scan messages
WiFiClientSecure client;
UniversalTelegramBot bot(BOT_TOKEN, client);
unsigned long bot_lasttime; // last time messages’ scan has been done
void handleNewMessages(int numNewMessages)
{
Serial.print(“handleNewMessages “);
Serial.println(numNewMessages);
for (int i = 0; i BOT_MTBS)
{
int numNewMessages = bot.getUpdates(bot.last_message_received + 1);
while (numNewMessages)
{
Serial.println(“got response”);
handleNewMessages(numNewMessages);
numNewMessages = bot.getUpdates(bot.last_message_received + 1);
}
bot_lasttime = millis();
}
}