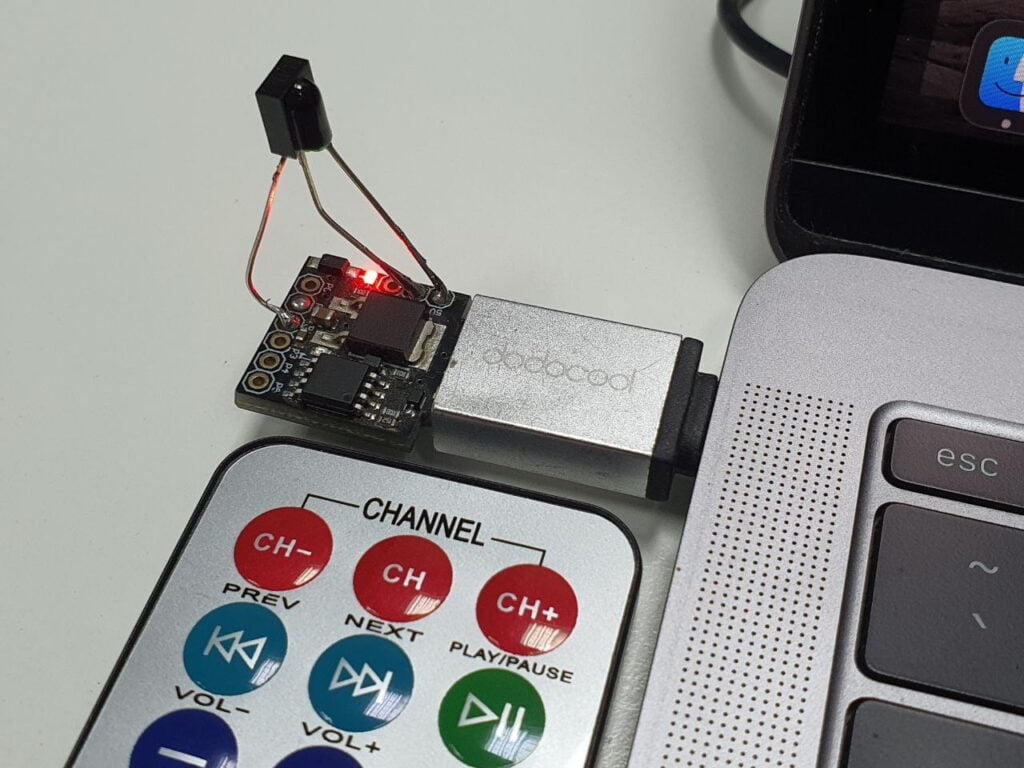
In this project, we are going to make a USB IR remote receiver that will act as a keyboard using Digispark Attiny85 to control the functions of the media player on our PC or laptop using an IR remote.

Things required
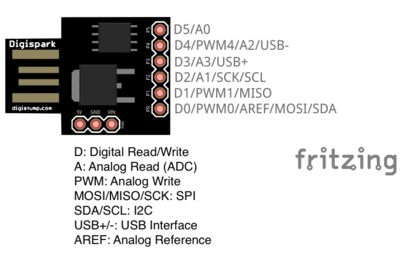
Pinout diagram


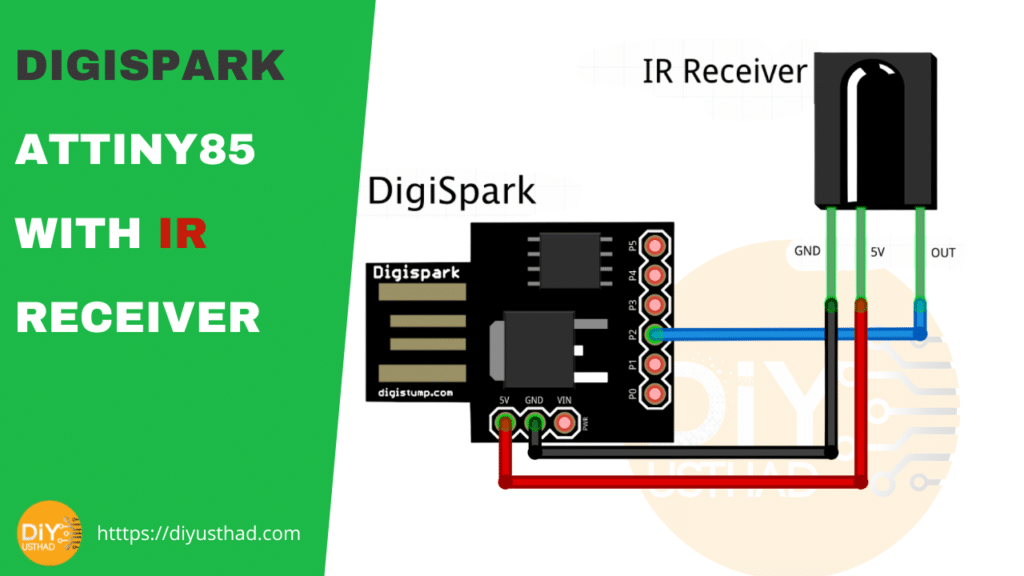
Circuit


- Connect the GND of Digispark to the GND of IR receiver.
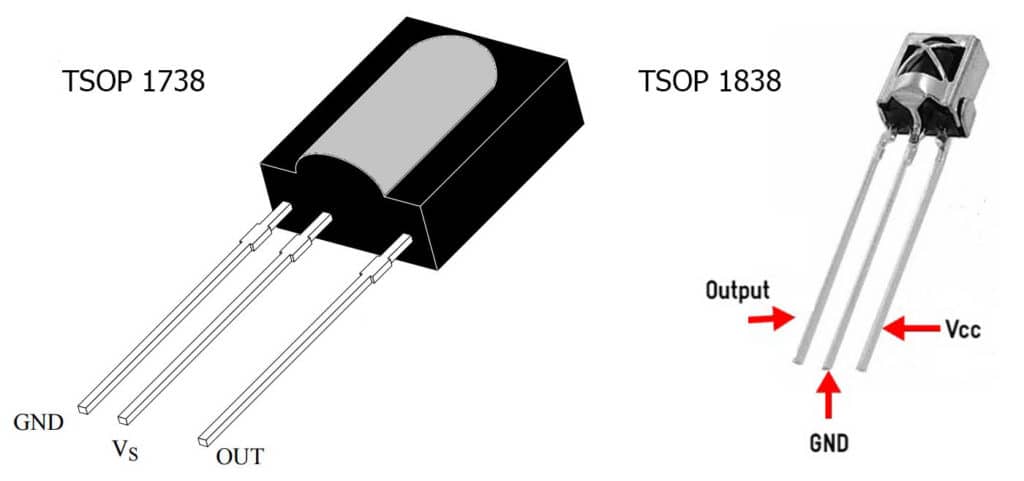
- Connect the 5V of Digispark attiny85 to the Vs of IR receiver.
- Finally connect the P2 to the OUT pin of IR receiver. (cannot be changed, it is tied to an interrupt)
Setting up the library.
Instead of the official keyboard library for Digisaprk we are going to use TrinketHidCombo library by Adafruit to make Digispark Attiny85 as a HID device. Download the library from the below link.
https://github.com/adafruit/Adafruit-Trinket-USB
After downloading, manually add the library file from Arduino IDE Sketch -> include library -> add .ZIP library. Even though the TrinketHidCombo folder is not a ZIP file you can choose that.
Note
The downloaded folder from the above link will contain multiple libraries. From that, we only need to install TrinketHidCombo.
Code
The code is a remix of Dimax’s code from this forum: http://arduino.ru/forum/proekty/ik-distantsionnoe-upravlenie-kompom-cherez-digispark.
The below Arduino program contains the IR code for the remote which I used, It might not works with you if you are using another remote. So initially you have to find the code for your remote and change that in the below Arduino program.
Finding Your Remote’s Codes
In order to find the code first upload the below Arduino code to the Digispark. If you find any difficulty in uploading the code, follow this tutorial 👉 USING DIGISPARK WITH ARDUINO IDE.
After successfully uploading the code open notepad or any other text editor, and check that you have your keyboard layout set to US. Then plug in the digispark and try to press some button on your IR remote while aiming at the IR receiver.
Then you should see a HEX code automatically typed on the text editor, you should see the same code every time you press the same button. If not, try to aim at the receiver more accurately.
Note
If you see the same code for all buttons, that remote is not compatible with this project. Try a different remote or buy the one I mentioned above.
After collecting the code for any 5 buttons which you would like to use for the media player function (play/pause, next, previous, volume up, volume down). Then copy paste the HEX code in the Arduino program where it is mentioned and uplaod the code again to the Digispark.
Before uploading the code don’t forget to change the DEBUG to 0.
// **** TSOP is connected to port PB2 - cannot be changed, it is tied to an interrupt**** //////
#define REPEAT_DELAY 220

//Set to 0 after finding your codes
#define DEBUG 1

//Specify your remote codes here:
#define REMOTE_VOL_UP 0xFFA857
#define REMOTE_VOL_DOWN 0xFFE01F
#define REMOTE_PLAYPAUSE 0xFFC23D
#define REMOTE_NEXT 0xFF02FD
#define REMOTE_PREV 0xFF22DD


volatile uint8_t m = 0, tcnt = 0, startflag = 0;
uint32_t irdata = 0, keydata = 0 ;
bool pressed = false;
bool complete = false;

#include <avr/delay.h>
#include "TrinketHidCombo.h"

void setup() {
  DDRB |= (1 << DDB1); //P1 (LED) OUT not used in sketch
  PORTB |= 1 << PB2; // a PB2 lift will not hurt.
  GIMSK |= 1 << INT0; //interrupt int0 enable
  MCUCR |= 1 << ISC00; //Any logical change on INT0 generates an interrupt request
  GTCCR |= 1 << PSR0; TCCR0A = 0;
  TCCR0B = (1 << CS02) | (1 << CS00); // divider /1024
  TIMSK = 1 << TOIE0; //interrupt Timer/Counter1 Overflow  enable
  TrinketHidCombo.begin(); // start the USB device engine and enumerate
}

void loop() {

  if (complete) { // if a code has been received

    if (keydata != 0) //if a code is new
    {
      Action(keydata);
      pressed = true;
    }

    complete = false;
    ms_delay(REPEAT_DELAY); // to balance repeating/input delay of the remote

  }
  else if (pressed)
  {
    digitalWrite(1, LOW);
  }
  else
  {
    _delay_ms(1);//restrain USB polling on empty cycles
    TrinketHidCombo.poll(); // check if USB needs anything done
  }

}

ISR (INT0_vect) {
  if (PINB & 1 << 2) { // If log1
    TCNT0 = 0;
  }
  else {
    tcnt = TCNT0; // If log0
    if (startflag) {
      if (30 > tcnt  && tcnt > 2) {
        if (tcnt > 15 && m < 32) {
          irdata |= (2147483648 >> m);
        }
        m++;
      }
    }
    else  startflag = 1;
  }
}
ISR (TIMER0_OVF_vect) {
  if (m)
    complete = true; m = 0; startflag = 0; keydata = irdata; irdata = 0; // if the index is not 0, then create an end flag
}

void ms_delay(uint16_t x) // USB polling delay function
{
  for (uint16_t m = 0; m < (x / 10); m++) {
    _delay_ms(10);
    TrinketHidCombo.poll();
  }
}

void Action(uint32_t keycode)
{
  switch (keycode)
  {
    case REMOTE_VOL_UP:
      TrinketHidCombo.pressMultimediaKey(MMKEY_VOL_UP);
      break;
    case REMOTE_VOL_DOWN:
      TrinketHidCombo.pressMultimediaKey(MMKEY_VOL_DOWN);
      break;
    case REMOTE_PREV:
      TrinketHidCombo.pressMultimediaKey(MMKEY_SCAN_PREV_TRACK);
      break;
    case REMOTE_NEXT:
      TrinketHidCombo.pressMultimediaKey(MMKEY_SCAN_NEXT_TRACK);
      break;
    case REMOTE_PLAYPAUSE:
      TrinketHidCombo.pressMultimediaKey(MMKEY_PLAYPAUSE);
      break;
    default:
      if(DEBUG)
        TrinketHidCombo.println(keydata, HEX);
      else
        return;

  }
  digitalWrite(1, HIGH);
}
Demo
Our Digispark IR receiver will work in all operating systems (Windows, Mac OS, Linux, Android). The Digispark will act as a Keyboard and will simulate the Media Keys (Pay/Pause, Previous, Next, Volume up, Volume down).
We can control any media players including YouTube. Watch the below video in which I’m testing it in Windows, Mac and Android.
Troubleshooting
If you find any difficulty using the media control keys in windows 10, then follow the below tutorial.


