


In this project, we are going to make an IoT-connected device using the tuya IoT platform and ESP8266 module.
What is Tuya IoT
Tuya is a leading global IoT Cloud Platform that connects the intelligent needs of brands, OEMs, developers, and retail chains. The platform provides developers with a one-stop IoT PaaS-level solution that contains hardware development tools, global cloud services, and smart business platform development, Tuya offering comprehensive ecosystem empowerment from technology to marketing channels to build the world’s leading IoT Cloud Platform.
Hardware required
| Components | Amazon | AliExpress | Banggood |
|---|---|---|---|
| Arduino | |||
| ESP8266 | |||
| Jumper Wire | |||
| Bread Board |


Softwares required
| Softwares | Download |
|---|---|
| Arduino IDE | |
| Tuya firmware burner | |
| Tuya Smart app (Android) | |
| Tuya Smart app (IOS) |
Accounts needed
| Website | Signup Link |
|---|---|
| Tuya Smart PMS | https://pms.tuya.com/en/reg |
| Tuya IoT | https://auth.tuya.com/register |
Let’s build it!
Step 1: Create a product and get the PID
- Signup or login to tuya IoT from https://iot.tuya.com/
- Then click on “Product” and choose “Development“.
- From “Product” page, click on the “Create” button.
- Now click on the “Lighting” tab and then select “Light Source”.
- Then select “Custom Solution” and choose “Light Source“.
- Now enter a name for your product, check the option “WI-FI” under protocols.
- After this process, the system will ask you to configure the default device control functions. Leave these 3 functions as default and click ok.
- Copy and save your PID.

Step 2: Getting and Activating token in smart PMS
- Send the PID of the device we just created in the tuya IoT platform and the Tuya Account email ID to devops@tuya.com.
- After some time(may be take some long hours) you will receive your token code in reply to the email.
- Now Signup or login into pms.tuya.com.
- After login click on Production Manage -> Work order Manage -> Activation Code.
- Now paste the Token we received in the email to the form in “Activation Code” page and click confirm.
- Now a popup will appear saying “Production certification confirmation“.
- That’s it now the Token is activated.
Step 3: Burning authorizations for ESP8266
- Download and install the Tuya firmware burner from here.
- Then login with using your PMS account detail and then click Online Login. You can choose Automatic Login and Remember The Password if needed.
- Then from the menu File -> Setup under Basic Settings you must set up Burning Baud to 921600 and click Ok.
- Now click Enter Token and select Token from the Popup window.
- Paste your Token ID to the provided field, select Firmware Download check box and from the Select work station dropdown list select Burning Authorization.
- Click OK.
- Now connect the ESP8266 board to your computer and choose the right com port.
- Now click RUN. The burning process will take few seconds, wait for it to finish and a “Success” message will be displayed.
Circuit
Follow the below circuit diagram to connect your ESP8266 with Arduino.
Note: Here I’m using NodeMUC but any other ESP8266 development boards will work
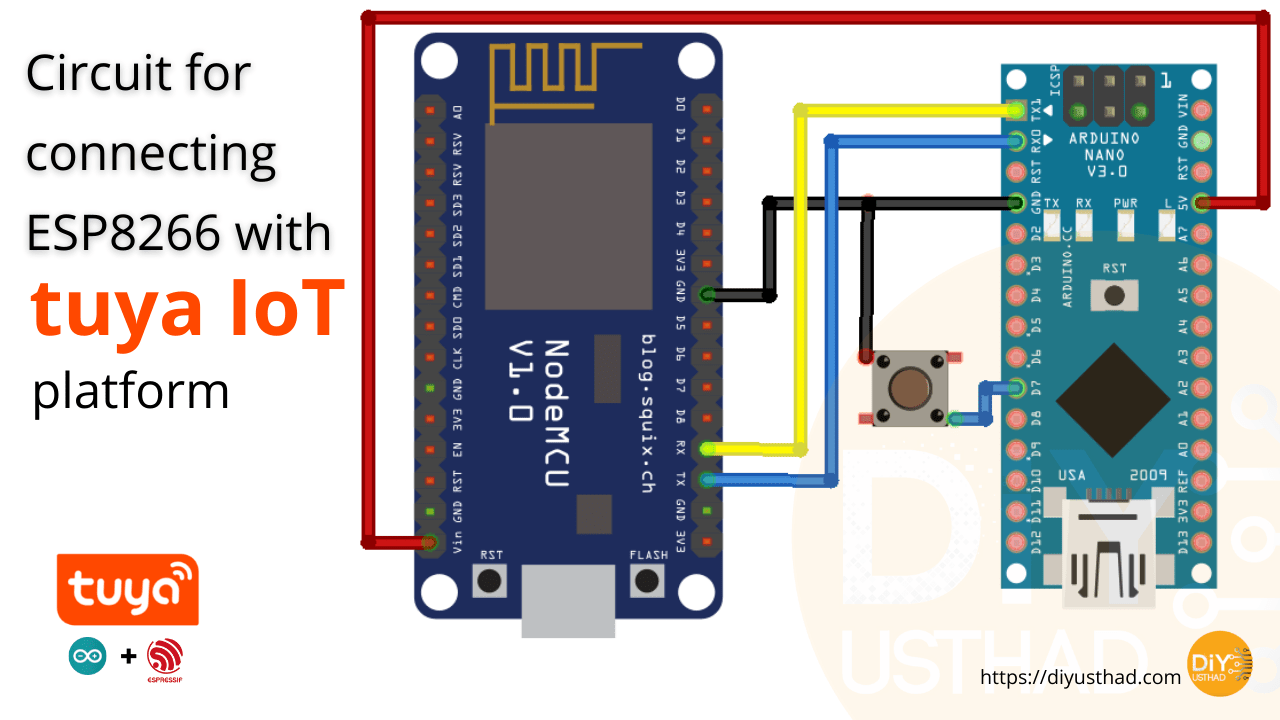
| ESP8266 | Arduino | Momentary Push Button |
|---|---|---|
| TX | RX | |
| RX | TX | |
| GND | GND | terminal 1 |
| Digital Pin 7 | terminal 2 | |
| VIN | 5v |
Arduino Programing
For making things easier for beginners in this tutorial we are going to use an example code provided by the TUYA_WIFI_MCU_SDK library for Arduino.
Sign up and join the Tuya Developer Arduino Beta Test
Installing the TUYA_WIFI_MCU_SDK library
- Open your Arduino IDE.
- From menus go to Sketch -> Include library -> Manage Libraries.
- When the dialog box apears search for TUYA_WIFI_MCU_SDK & click install.
We need to change the PID given in the example code to the PID of our device which we created from the tuya IoT platform. Find the below line in the code and change the PID & also we need to change the MCU version.
Note: Check your MCU version in the tuya firmware burning app.
unsigned char pid[] = {"ma67l9sgmdyg3d2k"};
unsigned char mcu_ver[] = {"1.0.0"};
Note: While uploading the code remove the RX connection from Arduino.
After making the changes upload the code to your Arduino, don’t forget to choose the right board and port. If you are using Arduino Nano also choose the right bootloader version otherwise the uploading process will fail.
Code
/*
 * @FileName: start.ino
 * @Author: Tuya
 * @Email:
 * @LastEditors: Tuya
 * @Date: 2021-04-10 11:24:27
 * @LastEditTime: 2021-04-28 19:48:31
 * @Copyright: HANGZHOU TUYA INFORMATION TECHNOLOGY CO.,LTD
 * @Company: http://www.tuya.com
 * @Description: This demo is based on the Arduino UNO, and the LEDs on the UNO board are controlled by the Tuya Smart App.
 *               Enter network connection mode when Pin7 to GND.
 * @Github:https://github.com/tuya/tuya-wifi-mcu-sdk-arduino-library
 */

#include <TuyaWifi.h>
#include <SoftwareSerial.h>

TuyaWifi my_device;


/* Current LED status */
unsigned char led_state = 0;
/* Connect network button pin */
int key_pin = 7;

/* Data point define */
#define DPID_SWITCH 20

/* Stores all DPs and their types. PS: array[][0]:dpid, array[][1]:dp type.
 *                                     dp type(TuyaDefs.h) : DP_TYPE_RAW, DP_TYPE_BOOL, DP_TYPE_VALUE, DP_TYPE_STRING, DP_TYPE_ENUM, DP_TYPE_BITMAP
*/
unsigned char dp_array[][2] =
{
  {DPID_SWITCH, DP_TYPE_BOOL},
};

unsigned char pid[] = {"ma67l9sgmdyg3d2k"};
unsigned char mcu_ver[] = {"1.0.0"};

/* last time */
unsigned long last_time = 0;

void setup()
{
  // Serial.begin(9600);
  Serial.begin(9600);

  //Initialize led port, turn off led.
  pinMode(LED_BUILTIN, OUTPUT);
  digitalWrite(LED_BUILTIN, LOW);

  //Initialize networking keys.
  pinMode(key_pin, INPUT_PULLUP);

  //Enter the PID and MCU software version
  my_device.init(pid, mcu_ver);
  //incoming all DPs and their types array, DP numbers
  my_device.set_dp_cmd_total(dp_array, 1);
  //register DP download processing callback function
  my_device.dp_process_func_register(dp_process);
  //register upload all DP callback function
  my_device.dp_update_all_func_register(dp_update_all);

  last_time = millis();
}

void loop()
{
  my_device.uart_service();

  //Enter the connection network mode when Pin7 is pressed.
  if (digitalRead(key_pin) == LOW) {
    delay(80);
    if (digitalRead(key_pin) == LOW) {
      my_device.mcu_set_wifi_mode(SMART_CONFIG);
    }
  }
  /* LED blinks when network is being connected */
  if ((my_device.mcu_get_wifi_work_state() != WIFI_LOW_POWER) && (my_device.mcu_get_wifi_work_state() != WIFI_CONN_CLOUD) && (my_device.mcu_get_wifi_work_state() != WIFI_SATE_UNKNOW)) {
    if (millis()- last_time >= 500) {
      last_time = millis();

      if (led_state == LOW) {
        led_state = HIGH;
      } else {
        led_state = LOW;
      }
      digitalWrite(LED_BUILTIN, led_state);
    }
  }

  delay(10);
}

/**
 * @description: DP download callback function.
 * @param {unsigned char} dpid
 * @param {const unsigned char} value
 * @param {unsigned short} length
 * @return {unsigned char}
 */
unsigned char dp_process(unsigned char dpid,const unsigned char value[], unsigned short length)
{
  switch(dpid) {
    case DPID_SWITCH:
      led_state = my_device.mcu_get_dp_download_data(dpid, value, length); /* Get the value of the down DP command */
      if (led_state) {
        //Turn on
        digitalWrite(LED_BUILTIN, HIGH);
      } else {
        //Turn off
        digitalWrite(LED_BUILTIN, LOW);
      }
      //Status changes should be reported.
      my_device.mcu_dp_update(dpid, value, length);
    break;

    default:break;
  }
  return SUCCESS;
}

/**
 * @description: Upload all DP status of the current device.
 * @param {*}
 * @return {*}
 */
void dp_update_all(void)
{
  my_device.mcu_dp_update(DPID_SWITCH, led_state, 1);
}
Adding device into tuya smart app
After uploading the code connect back the RX connection of Arduino and turn on the power. Now press and hold the push button for 3-4 seconds. After releasing the inbuilt LED on the Arduino will start to blink.
- Now open the Tuya Smart App in your phone, For testing you can use the app as guest user (click on Try now).
- Now click on “Add Device“.
- There will be bunch of devices listed as categories, for us we are choosing “Light Source(WiFi)” from “Lighting” tab.
- Now choose your WiFi network and enter the password and click next.
- Select “Confirm the light is blinking rapidly” and click next.
- Now the app will scan and add the device to your app dashboard, it may take a while.

Testing
Open the device from the dashboard and try clicking the ON/OFF button, the inbuilt LED of your Arduino with toggle accordingly in sync with the smart app button state.
That’s it guys we have successfully made an IoT device with ESP8266 and Tuya IoT. Instead of the inbuilt LED on the Arduino now you can change the code to control any pin of the Arduino and use relays to control any appliances in your home like fan, TV, oven, lights, RGB lights, etc…
Troubleshooting
- If you are facing any problem in burning the firmware to ESP8266
- Check the baud rate and the port.
- Remove cables from TX and RX.
- If device initialization fails
- Check your network connection
- If you are using hotspot connection from laptop or mobile somtimes it wont work so change to another 2.5GHz network.
- If some other device is showing instead of your device in the app dashboard, check the PID which you gave in the Arduino code.
- If uplaoding code to Arduino fails
- Check the port and device, incase of Arduino nano also check the bootloader version.
- Remove connection from RX.
Video

Conclusion
If you want to build a commercial automation product or provide a great and easy tool for your customer to integrate any technology into the internet of things with ESP8266 or If you want an app with a simple interface and a great experience for the users. The answer to all these is Tuya IoT Smart technology.