

Let’s do a small project to learn how to use an electro-mechanical relay with An Arduino. To know more about relays and types of relays read this article “Relay In A Nutshell“, where I explained everything in detail.

Project concept
We can create a light-activated relay circuit with the help of Arduino that will automatically turn ON the relay when the surrounding light is low and automatically turn OFF the relay when the surrounding light is high.
Working
For building this project we use an LDR sensor or Photoresistor which will change its resistance depending on the light falling on its surface.
To learn more about LDR and how to connect LDR with Arduino check out this tutorial.
By using Arduino will read the change in the resistance of LDR which is connected to the analog pin of the Arduino and then according to the value obtained we will trigger the relay ON or OFF when the value is above or below the threshold value that we preset in the code.
Hardware required
| Components | |||
|---|---|---|---|
| Relay Module | |||
| Arduino UNO | |||
| Jumper Cables | |||
| LDR | |||
| Resistor Kit |


Circuit for relay with an Arduino

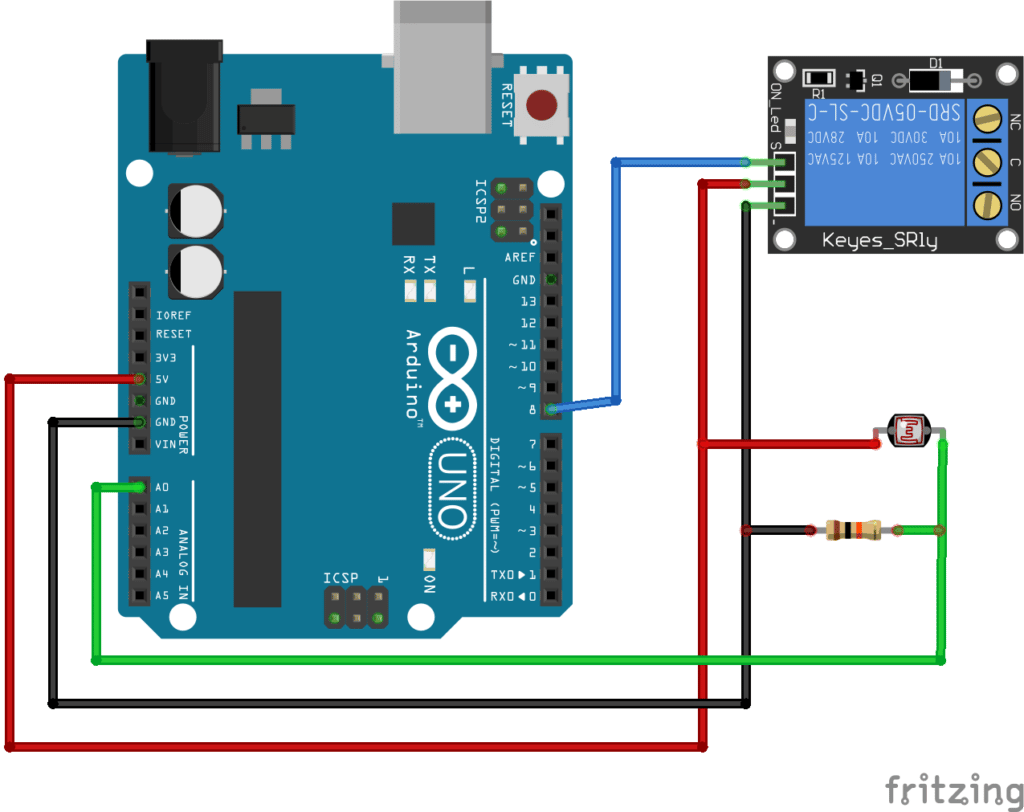
Connecting LDR to Arduino UNO
- Connect the A0 analog pin of Arduino to any pin of the LDR.
- Connect the other pin of the LDR to the 5v of Arduino.
- Then connect the 10k resistor from GND to A0 of Arduino.
Connecting Relay to Arduino UNO
- Connect the digital pin 8 of Arduino to the Signal pin of the relay module.
- Connect the 5v from Arduino to the Power connection of the relay module.
- Finally, connect the ground Arduino to the ground of the relay module.
Note
If you are using a normal relay instead of a relay module (which contains an in-build transistor/opamp on PCB) then you have to use a transistor in between the Arduino and relay to drive the relay because Arduino alone cannot supply enough current to drive a relay.
Code
//diyusthad.com
//trigger relay with LDR
//Program for triggering a relay with arduino and LDR

int sensorPin = A0;   // select the input pin for ldr
int sensorValue = 0;  // variable to store the value coming from the sensor
int thresholdValue = 700;
int relayPin = 8;

void setup() {
  pinMode(relayPin, OUTPUT);  //pin connected to the relay
  Serial.begin(9600);         //sets serial port for communication
}

void loop() {
  // read the value from the sensor:
  sensorValue = analogRead(sensorPin);
  Serial.println(sensorValue);  //prints the values coming from the sensor in serial monitor

  if (sensorValue < thresholdValue)  //setting a threshold value
    digitalWrite(relayPin, HIGH);    //turn relay ON

  else digitalWrite(relayPin, LOW);  //turn relay OFF

  delay(100);
}
Upload the code and test the working of the circuit after that check the serial monitor to read the LDR readings and adjust the threshold value according to your need.
Conclusion
In this article, I covered the basics of the connection between Arduino and the relay module with an LDR as the trigger.
If you find this article helpful please let me know in the comments, share it with your friends, and also feel free to ask any doubts.