INTRODUCTION
In this chapter, we are going to learn the three different ways of connecting a push-button with an Arduino microcontroller.
Hardware Required
Three Ways
- Internal pull-up resistor
- External pull-up resistor
- External pull-down resistor
Internal pull-up resistor
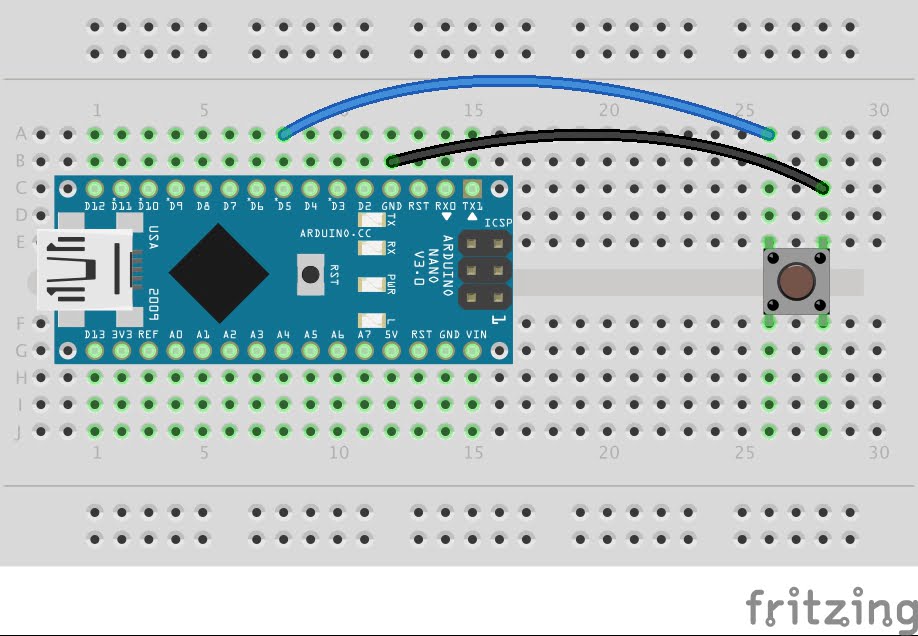
- Connect the push button with Arduino as shown in the circut ie,
- Connect one terminal of the push button to any digital pin of Arduino in my case I’m using digital pin D5
- Then connect the other terminal of the push button to the ground of Arduino.
- Now upload the below code.
Code
Result
- By default, the pin state will be HIGH.
- When we press the push button the pin state will change to LOW.
External pull-up resistor
- Connect one of the terminal of the push button to any digital pin of Arduino, in my case I have used digital pin 5.
- Connect the other terminal of the push button to the ground of Arduino.
- Then connect a resistor of value 10 Kohms from the digital pin which you have connected the push button to the 5v of Arduino, in my case I have connected the resistor form digital pin 5 to 5v.
- Now upload the below program.
Code
Result
- By default, the pin state will be HIGH
- When I press the push button the state will change to LOW.
External pull-down resistor
- Connect one of the terminal of the push button to any digital pin of Arduino, in my case I have used digital pin 5.
- Then connect the other terminal to the 5v of Arduino.
- Then connect a resistor of value 10 Kohms from the digital pin which you have connected the push button to the ground of Arduino, in my case I have connected the resistor form digital pin 5 to ground.
- Now upload the below code.
Code
Result
- By default, the pin state will be LOW
- When we press the push button the state will change to HIGH from LOW
Video
To buy electronic components order from UTSOURCE

